How to Create a Charming Baby Quilt with Animal Embroidery
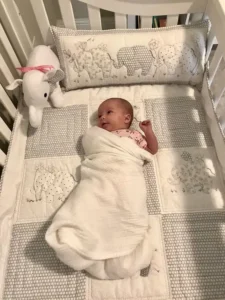
Creating a baby quilt is a wonderful project that combines craftsmanship, creativity, and love. The quilt in the image showcases adorable animal motifs and a cozy, inviting design perfect for a nursery. Here’s a detailed step-by-step guide to help you craft a similar baby quilt, including fabric selection, embroidery, and assembly.
Materials Needed:
Soft cotton fabric in pastel or neutral shades
Embroidery floss in coordinating colors
Batting (lightweight)
Sewing machine and related accessories
Embroidery hoop (optional)
Fabric scissors
Pins or clips
Thread (matching or contrasting)
Pattern or stencil for animal designs
Step 1: Choose Your Fabric
Start by selecting soft, baby-friendly fabrics such as cotton or flannel. For the quilt top, opt for fabric with small, subtle patterns or plain fabrics that will serve as the background. Neutral tones like gray, white, or pastel pinks are popular choices.
Step 2: Design Your Animal Motifs
Decide on the animals you’d like to feature, such as elephants, giraffes, or bears. Create or find embroidery patterns or stencils. The image shows elephants with floral details, which add a whimsical, gentle touch.
Step 3: Cut Your Fabric
Cut the fabric into squares or rectangles, typically measuring 8×8 inches or 10×10 inches, depending on the desired quilt size. For a standard baby quilt, 4×4 or 5×5 blocks work well.
Step 4: Embroider the Animal Designs
Using embroidery floss and a hoop (if available), embroider the animals onto some of the fabric squares. Use simple stitches such as backstitch, satin stitch, or French knots to create details. Add floral or decorative elements to enhance the animals’ charm.
Step 5: Assemble the Quilt Top
Arrange your embroidered and plain fabric squares in a pleasing layout. Sew the squares together in rows, then join the rows to form the complete quilt top. Use a 1/4-inch seam allowance for neatness.
Step 6: Layer the Quilt
Lay the backing fabric (a soft, coordinating fabric) right side down on a flat surface. Place the batting over it, then position the quilt top right side up on top of the batting. Pin or clip all layers securely to prevent shifting.
Step 7: Quilt the Layers
Sew around each square or along the seams (stitch-in-the-ditch) to secure the layers. For added texture, you can quilt in free-form shapes or motifs, depending on your skill level.
Step 8: Bind the Edges
Trim any excess batting and backing fabric. Finish the edges with a clean binding strip, folded and stitched around the perimeter of the quilt, giving it a polished look.
Step 9: Final Touches
Add a stuffed animal or decorative pillow, similar to the plush elephant in the image, for an adorable nursery touch. You may also sew or attach little fabric or embroidered embellishments on the corners or edges.
Tips for Success:
Keep embroidery simple for a delicate look.
Use high-quality, baby-safe fabrics and thread.
Hand-wash and gently tumble dry your finished quilt for longevity.
By following these steps, you can create a beautiful, personalized baby quilt that will be cherished for years to come. Whether you choose to embroider sweet animals or other nursery motifs, your handmade quilt will bring warmth and charm to any nursery!