
How to Make a Floral Patchwork Quilt: Patchwork Garden
Project Summary:
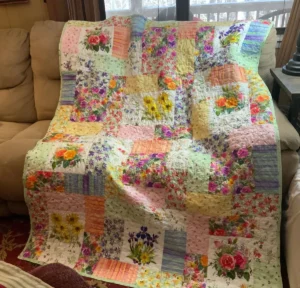
Quilt Type: Patchwork with blocks of varying sizes and a continuous border.
Style: Romantic, floral, in pastel shades (pink, yellow, lilac, light green) with touches of vibrant colors.
Typical Structure: Combination of patchwork blocks with floral and plain fabrics, arranged in a compact mosaic, finishing with a narrow border to outline the whole.
Materials Needed:
Fabric:
Various scraps with floral prints in light colors (pink, yellow, lilac, green, coral).
Plain fabrics or with soft stripes for insets (in coordinated tones).
Backing fabric in a light neutral color.
Fabric for the batting (optional: fiberfill or synthetic batting).
Quilt and trimmings:
Sewing machine.
Sharp scissors or rotary cutter.
Patchwork ruler and templates if desired for standardized blocks.
Pins, matching sewing thread.
Iron.
Measuring tape.
Finishing:
Embroidery thread or zigzag stitch on the machine.
Optional: bias tape for the border.
Pattern format (design)
Layout description:
Blocks of varying sizes (e.g., 8 x 8 cm, 12 x 12 cm, 16 x 16 cm) distributed irregularly for an organic yet balanced look.
Interiors with plain or softly striped fabrics to separate the floral areas.
Borders in light green or cream tones that outline the whole.
Step-by-step:
Planning the set:
Separate the scraps into different colors and patterns, grouping large florals, florals on light backgrounds, and coordinated plain fabrics.
1- Creating a simple layout sketch on paper
Choose 3-4 block sizes (e.g., 8×8, 12×12, 16×16 cm) and distribute them across the surface, maintaining color balance.
2- Preparing the blocks
Cut fabric scraps in the chosen sizes with small seam allowances (1.2 cm extra on each side).
Assemble each block with a floral centerpiece surrounded by strips of plain fabric to create soft contrasts.
Sew the blocks together with 0.5 cm to 0.75 cm stitching to keep the quilt compact.
3- Assembling the top
Arrange the sewn blocks in the desired position on a flat surface.
Pin each stitch line to keep everything stable.
Sew the rows of blocks together sequentially, always with careful alignment to avoid ripples.
4- Preparing the backing and batting
Cut the backing 2.5 cm larger on each side than the top to facilitate finishing.
Place the batting on top of the backing with the top side facing down, then the top side with the right side facing up.
Secure everything with pins or safety needles.
5- Quilting
Use small stitches, in squares or straight lines, to maintain the “patchwork” look.
If you prefer, do soft quilting with straight diagonal lines or simple waves.
Be careful not to pierce the floral fabrics with very strong stitches.
6- Finishing the edge
Cut a strip of bias tape wide enough to go around the entire perimeter.
Join the bias tape at the top to form the edge, sewing with small, straight stitches for a clean finish.
Fold the edge to the wrong side and finish with an invisible stitch.
Helpful Tips:
Choose a cohesive color palette: pastel shades with warm accents (pink, yellow, lavender) help maintain a soft look.
Vary the size of the blocks to create depth, but keep seam allowances consistent.
Add a small cushion or additional patch to the side for a personalized touch.
How to adapt the pattern to different sizes:
Sofa bedspread: use larger blocks (e.g., 12×12 cm) with fewer blocks.
Bedspread: combine 12×12 cm and 16×16 cm blocks for a larger surface.
Children’s bedspread: use smaller blocks (8×8 cm) and less border for a delicate look.
Conclusion:
The “Patchwork Garden” pattern is a gentle variation of the patchwork technique, with floral and plain patchwork blocks, adding romantic elegance to any room. With careful color selection and block arrangement, the resulting piece will have a unique and cozy handcrafted feel.