
How to make a Log Cabin pattern quilt
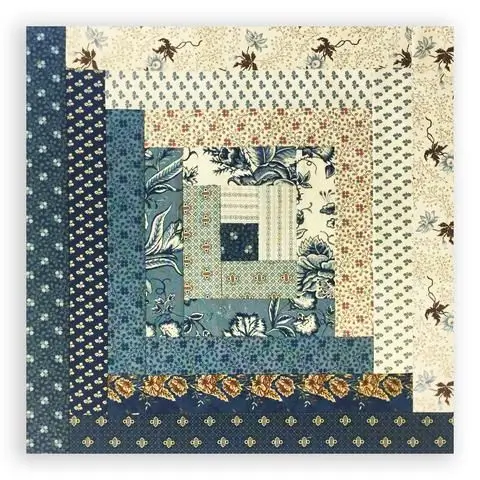
The Log Cabin pattern is one of the most traditional patchwork patterns. It’s perfect for beginners, as it’s made with strips of fabric sewn around a central square, forming blocks that resemble a “cabin”. Besides being beautiful, it’s a versatile and very welcoming project.
Materials needed:
• Fabric scraps (preferably pre-cut strips)
• 1 piece of fabric for the center (small squares)
• Cutting mat (optional)
• Patchwork ruler
• Rotary cutter or scissors
• Sewing machine
• Thread
• Iron
• Acrylic batting (stuffing)
• Fabric for the lining
• Pins or clips
Step 1: Cut the fabrics
• Cut a central square (usually between 5 cm and 7 cm)
• Cut strips of fabric between 4 cm and 6 cm wide
• Separate the strips into two groups:
– Light colors
– Dark colors
This is important to create the characteristic contrast of the Log Cabin.
Step 2: Start the block
1. Take the central square
2. Sew the first strip to one side
3. Press with an iron (this makes all the difference in the result!)
Step 3: Continue assembling around
• Sew the strips around the square, always rotating the block
• Alternate between light and dark fabrics
• Always iron after each seam
Tip: sew in sequence (spiral type) — this makes it much easier!
Step 4: Adjust the size of the block
When finished:
• Use a ruler to align the block
• Cut off the excess to make it square
Repeat the process until you have several identical blocks.
Step 5: Assemble the quilt
• Arrange the blocks on the floor or table
• You can create different effects:
– Forming designs (like diamonds)
– Alternating directions
– Random layout
This step is super creative!
Step 6: Sew the blocks together
• Join the blocks in rows
• Then sew the rows together
• Iron everything for a nice finish
Step 7: Assemble the “sandwich”
Now you will assemble the quilt:
1. Lining (bottom part)
2. Acrylic batting (middle)
3. Patchwork top (top part)
Pin or clip it in place.
Step 8: Quilt
• Sew over the quilt to join the layers
• It can be:
– Straight stitch (easier for beginners)
– Following the blocks
Step 9: Finish with bias binding
• Finish the edges with bias binding
• This gives a professional touch to your quilt
Final tips:
• Start with a few blocks (like a small quilt or blanket)
• Don’t worry about perfection — the important thing is to learn
• Choose fabrics you love
• Enjoy every step of the process!
Conclusion
Making a Log Cabin pattern quilt is an incredible experience. Even as a beginner, you can create a beautiful piece, full of meaning and totally unique.
Each block tells a story… and in the end, you will have a quilt made with care and dedication.