How to Make a Patchwork Tote Bag
Materials Needed:
Assorted fabric scraps (preferably coordinating colors and patterns).
Main fabric (for the bag lining and exterior).
Fusible interfacing or batting (for structure).
Zipper.
Thread matching your fabrics.
Sewing machine.
Scissors or rotary cutter.
Pins or clips.
Pattern template for tote bag (optional, but helpful).
Step-by-Step Instructions:
1. Design and Cut Your Fabric Pieces
Decide on the size of your tote bag (e.g., 14″ x 16″ for a standard size).
Cut your main fabric pieces for the front, back, bottom, and sides.
For the patchwork section, cut small fabric rectangles or squares (e.g., 3″ x 3″ or 4″ x 4″).
2. Prepare the Patchwork Panel
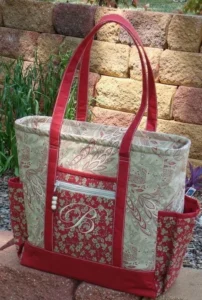
Arrange your fabric scraps into a pleasing design. The pattern in the image features a central floral panel with a monogram, surrounded by complementary fabrics.
Sew the small rectangles or squares together in rows, then sew rows to each other to form the patchwork panel.
Press seams flat once sewn.
3. Add Monogram or Embellishments
For the letter “B” or any monogram, use a fabric applique or embroidery:
Cut the letter from contrasting fabric.
Sew or iron it onto the patchwork panel.
Alternatively, you can draw and embroider the letter.
4. Assemble Exterior of the Bag
Attach the patchwork panel to the main fabric pieces for the front of the bag.
Sew side and bottom pieces to form the overall tote shape.
Add reinforcement or interfacing inside for durability.
5. Create Handles
Cut two long strips of fabric for the handles (about 2″ wide and 22″ long).
Fold each strip in half lengthwise and sew along the edges.
Turn right side out.
Attach the handles securely to the top of the bag.
6. Add Zipper Pocket (Optional)
Sew a small pocket with a zipper on the outside or inside of the bag.
To do this, sew the zipper onto the pocket fabric, then attach the pocket to the lining or outside as preferred.
7. Assemble the Bag
Sew the exterior and lining pieces together, right sides facing.
Leave an opening in the lining for turning.
Turn the bag right side out through the opening.
Sew the opening closed.
Topstitch around the top edge for a finished look.
8. Finish Edges and Final Touches
Add any additional embellishments like flowers, beads, or monograms.
Ensure all seams are securely stitched.