
How to make a yo-yo bag (fabric scraps)
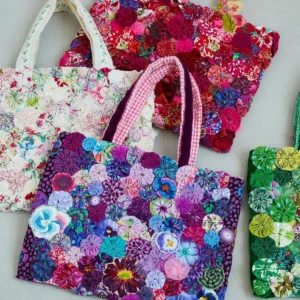
Yo-yo bags are charming handcrafted pieces, made with small circles of fabric gathered and sewn by hand. They are perfect for reusing scraps and creating unique, colorful pieces full of personality — like those in the images, which show vibrant models and also more delicate versions with organized patterns.
Below, you’ll find a detailed guide to making your own yo-yo bag.
Materials Needed:
• Cotton fabric scraps (printed or plain)
• Scissors
• Circular template (can be a cup, lid, or cardboard template)
• Strong thread (preferably kite string or double sewing thread)
• Needle
• Pins
• Lining fabric
• Acrylic batting or structural fabric (optional, for firmness)
• Base fabric (to structure the bag)
• Sewing machine (optional, but makes it easier)
• Handle (fabric, leather, chain, or ready-made)
• Magnetic button or zipper (optional)
Step 1 – Preparing the Yo-Yos
1. Cut the fabric circles
Use a circular template 6 to 10 cm in diameter.
The larger the circle, the larger the yo-yo will be.
2. Baste the edge
Fold approximately 0.5 cm of the edge inwards and make basting stitches around the entire circle.
3. Gather and Finish
Pull the thread gently until it forms a “little flower”.
Adjust the gathers and tie a firm knot to finish.
4. Optional: Decorative Center
You can sew:
– Buttons
– Pearls
– Small felt circles
Repeat the process until you have enough yo-yos to cover the desired size of the bag.
Step 2 – Assembling the Bag Panel
There are two main ways:
Method 1 – Sewing Yo-yos to Yo-yos
• Join the yo-yos by the sides with small invisible stitches.
• Form rows.
• Then, sew the rows together.
Method 2 – Applying to a Base (more structured)
• Cut a base fabric to the final size of the bag.
• Position the yo-yos side by side.
• Pin them together.
• Sew each one to the base with discreet stitches.
Tip: For an effect like in the first image (very colorful and organic), mix various prints.
For an effect like in the second image (organized look), separate colors and create geometric patterns.
Step 3 – Structuring the Bag
1) Cut:
– 2 outer pieces (with the yo-yos already applied)
– 2 lining pieces
– 2 batting pieces (if you want firmness)
2) If using batting:
– Sew the batting to the wrong side of the outer fabric.
3) Join the front and back:
– Sew the sides and bottom.
– Do the same with the lining (leave a small opening for turning).
Step 4 – Final Assembly
1. Place the outer piece inside the lining (right sides together).
2. Sew all around the top edge.
3. Turn the bag right side out through the opening left in the lining.
4. Close the opening with an invisible stitch.
5. Sew a finishing stitch along the top edge. Step 5 – Attaching the Strap
You can use:
• Fabric strap (made from the same fabric as the lining)
• Structured strap
• Metal chain
• Leather strap
Sew securely along the inside sides of the bag.
Closure (Optional):
• Concealed zipper
• Magnetic button
• Decorative bow
Important Tips:
• Use 100% cotton fabrics to facilitate gathering.
• Mix floral, plaid, and solid prints for a richer effect.
• For larger bags, use larger circles.
• For delicate bags, use smaller circles.
• Always use strong thread to prevent the yo-yos from unraveling.
Suggested Models:
• Large tote bag (ideal for everyday use)
• Small bag with chain (casual style)
• Colorful children’s bag
• Party clutch with monochromatic fabric scraps
Conclusion:
The fabric scrap bag is a charming, sustainable, and unique handcrafted project. Each piece is unique, as it depends on the chosen scraps and the composition created.
Besides being a great source of extra income, it’s also a therapeutic and creative activity.
Now all you have to do is gather your scraps and get started!