Patchwork chicken-themed pot holder/set of cozies
Decorative chicken-shaped potholders or coasters using fabric scraps
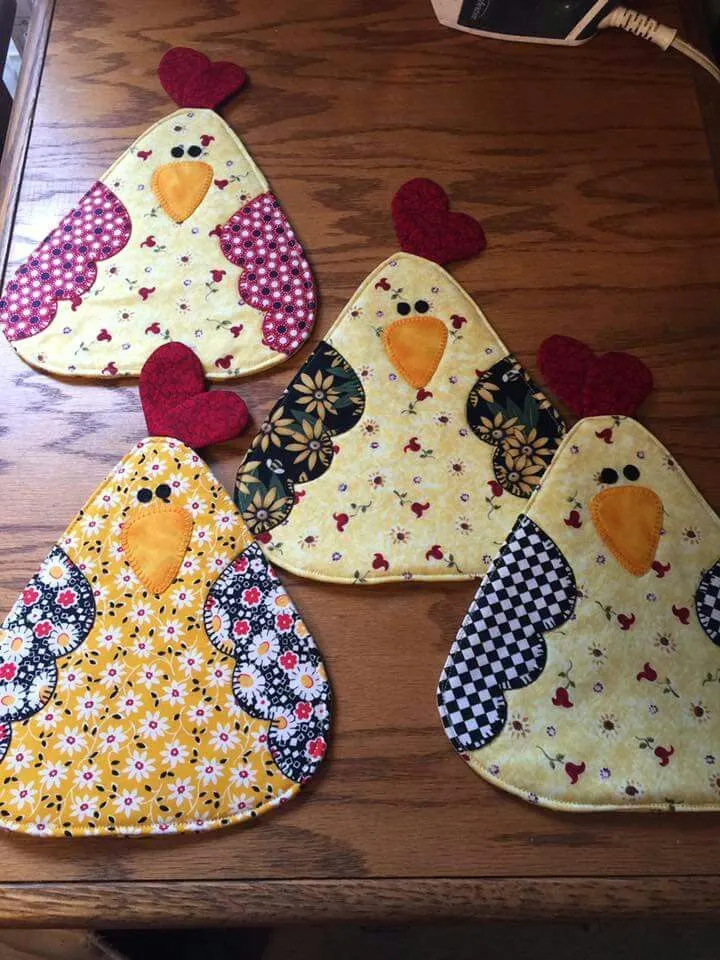
Materials: 100% cotton scraps, interfacing or thin batting, matching thread, needle, scissors, sewing machine (optional), pins, iron, paper pattern, fabric marker.
Size: Each pot holder measures approximately 8–10 inches (20–25 cm) tall and 7–9 inches (18–22 cm) wide at the base. Size can be adjusted to fit your pots or cups.
1. Planning the project
Shape: A chicken-shaped piece with rounded edges, designed to cradle a pot or cup.
Color scheme: Light yellow body, orange beak, black eyes, patterned wings, and red hearts as decorative elements.
Assembly: Attach wings to the sides, place the beak and eyes near the top center, and distribute hearts around the edge for decoration.
2. Materials needed
Fabric:
Yellow fabric scraps for the body.
Patterned fabrics (floral, striped, polka dot, etc.) for wings.
Orange fabric for the beak.
Red or burgundy fabric for hearts.
Interfacing/Batting: Lightweight interfacing or thin batting for structure and protection.
Thread: Matching colors.
Tools: Pins, scissors, sewing machine (optional), iron, paper pattern, fabric marker or chalk.
Optional: Button eyes or embroidery floss for eyes, bias tape for finishing edges.
3. Cutting (main pieces)
Body: A rounded triangular pattern resembling a chicken silhouette, approximately 8–10 inches tall.
Wings (2): Crescent/half-moon shapes, about 7–9 inches wide at the widest point.
Beak: An oval/diamond shape around 1.5–2 inches tall and 1–1.5 inches wide.
Eyes: Small circles (or use small black buttons or embroidery).
Hearts (decorative): 3–5 cm hearts to be distributed along the edge or around the body.
Interfacing/Batting: Cut to the size of the body piece.
4. Preparation (patchwork and assembly)
Wing construction: Sew together fabric scraps to create a patchwork wing if desired, or use single patterned pieces. Trim edges for a smooth contour.
Interfacing: Apply interfacing to the facing side of the body piece (and optionally to the wings) for extra sturdiness. Press with your iron.
5. Assembly steps
Assemble the body and wings:
Position the two wing pieces on the left and right sides of the body, aligned roughly with the upper third of the body.
Baste if needed to hold in place.
Attach the beak and eyes:
Place the orange beak at the top center of the body.
Place the eyes slightly above and to each side of the beak (use embroidery or buttons).
Add hearts and decorative elements:
Arrange red hearts around the body edges or near the wings before final stitching.
Sew the outer edge:
With right sides together, sew the body with the wings and any added pieces, leaving a small turning gap.
Clip curves and turn right side out.
Finish and compress:
Push all seams to the inside, press flat.
Insert batt or extra interior layer if desired for insulation and protection.
Slip stitch the turning gap closed.
6. Finishing touches
Edging: Optional topstitch around the outer edge for a neat finish.
Care instructions: If possible, wash on a gentle cycle; air dry recommended to preserve shape.
Personalization: Add a small loop or tab to hang, or add a small border in contrasting color for accent.
7. Variations and tips
Use different wing patterns for a patchwork look.
Adjust size for different pots or mugs (e.g., 6–8 inches tall for small cups, larger for bigger pots).
Replace hearts with small appliqué shapes (berries, flowers) for a different theme.
Add a small pocket on the back to hold recipe cards or tea bags.