
Step-by-step guide to making a 4×4 patchwork quilt block
Below is a complete guide to reproducing a patchwork block, with a 4×4 layout and diagonal border details.
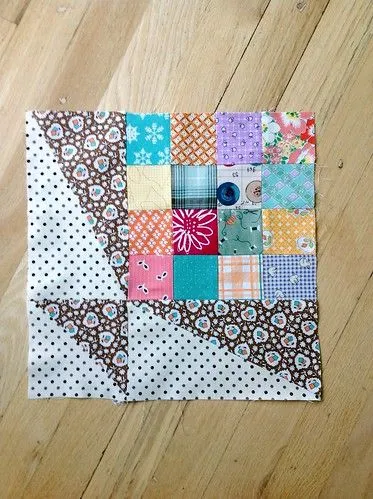
1. Planning and materials
• Block size: a standard block is 20 x 20 cm per center piece, with 0.5 to 1 cm seam allowances. Adjust according to the final project.
• Fabric:
– Various scraps: assorted colors and patterns (plaid, floral, polka dot, stripes).
– Base fabric for the block: white with black polka dots for one of the diagonals, and brown with a floral print for the other diagonal (as shown in the image).
• Diagonal applique:
– Triangles in light colors (white with polka dots) and triangles in floral brown to compose the opposite halves.
• Lining and stuffing (optional): for a heavier quilt.
• Tools:
– Sewing machine, thread matching the fabrics, rotary cutter, patchwork ruler, pins, tailor’s chalk, iron, scissors.
– Measuring tape, triangle templates (or paper) for marking diagonals.
2. Layout Preparation
• The block consists of:
– A diagonal band that divides the large square into two asymmetrical halves: one half with white and black polka dot fabric, the other half with brown floral fabric.
– An inner 4×4 grid of smaller squares in the center.
• Plan the color palette to maintain harmony (earthy tones, blues, yellows, pinks, etc.).
3. Cutting the Pieces
• Cut two identical pieces of base fabric, each 20 x 20 cm (or the desired size).
• Cutting the diagonal triangles:
– White polka dot triangles: 20 x 20 cm (divide into two diagonal halves).
The brown floral triangle: also 20 x 20 cm.
• Cut 16 pieces for the 4×4 grid, each 4.5 x 4.5 cm (if your final block is 20×20 cm with a 0.5 cm seam allowance, adjust to 4.5 cm to compensate for the margins).
4. Assembling the diagonal
• Fold the white polka dot piece in half diagonally to mark the seam line:
– Place the white triangle in the upper left corner of the main square with the diagonal half.
– Sew diagonally with a precise stitch or use the snap stitch technique (1 mm stitch).
• Do the same with the brown floral triangle in the lower right corner, forming two opposite diagonal halves.
• Join the two halves to form the 20 x 20 cm square with the clear diagonal separation.
5. Assembling the central grid (4×4)
• Arrange 16 smaller shops inside the central grid, forming a 4×4 matrix. • Align each square with a 0.5 cm to 1 cm seam allowance between them.
• Pin and sew a straight line around each square, maintaining the distance between the seams for a uniform appearance.
6. Final assembly of the block
• Attach the central grid to the diagonal triangles, carefully joining the edges so as not to displace the patches.
• Check the alignment of the edges and adjust if necessary.
• By joining, you will have a single block with distinct diagonals and a colored inner note.
7. Quilting and finishing
• If you are making a larger quilt, repeat the block according to the project layout (2×2, 3×3, 4×4, etc.).
• To finish, choose a border that complements the colors of the block.
• Quilt the leg of the block (sewing around each square and diagonally) to better secure the assembly.
8. Quick Tips
• Choose a cohesive color palette: use 4-5 predominant tones to maintain harmony between the patches.
• Use carbon paper to trace the diagonal with the necessary precision.
• If you prefer, make the block with two different diagonals (white with polka dots and brown floral) instead of a single diagonal to vary the look.
• Wash the block carefully after quilting to soften the fabric.