
Step-by-step guide to making a patchwork (squares) quilt
Below is a detailed step-by-step article for you to create your own quilt, using square blocks with gathered edges and patchwork in earthy and coral tones. Adjust the measurements according to the size of the bed.
1. Planning and materials
• Final size: define beforehand (e.g., 160 x 210 cm for a double bed; 210 x 210 cm for a queen).
• Fabrics:
Backing: light plain fabric (e.g., pale pink/beige).
Blocks: plaid/batik/stripe scraps in earthy tones, reds, oranges, and greens.
Borders: plain fabric for the outer edges and/or between blocks.
Backing: heavier fabric, equivalent to the size of the quilt.
Batting: medium thickness.
• Tools:
Sewing machine, thread in predominant colors, tape cutter, ruler, scissors, pins, chalk/laser marker.
Quilting machine or needle for hand quilting, iron.
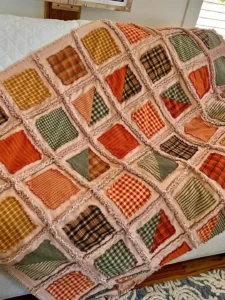
2. Block Design and Planning
• Typical layout: a grid of square blocks (e.g., 8 x 10 blocks for a medium quilt).
• Each block can have a central patch (checkered/polka dot pattern) surrounded by a border.
• Define the size of each block (e.g., 20 x 20 cm) and the width of the borders between blocks (e.g., 2 cm).
• Make a simple sketch to visualize the color palette.
3. Cuts
• Cut two fabrics for the quilt body (front and backing) to the final size, plus seam allowances.
• Cut the blocks:
For each block, cut 1 central piece of 20 x 20 cm (or the chosen size).
Cut 1 piece of border for each side of the block (2 x 22 cm, for example), depending on the width of the frame you plan.
• If using gathered borders, prepare strips of fabric 2.5 to 3 cm wide for each seam line between blocks.
4. Assembling the blocks
• Assemble the center block with the chosen patchwork (5-7 cm scraps cut and sewn together to form the center).
• Join the center to the surrounding frames, sewing with a straight stitch, aligning the edges well.
• Repeat for all blocks, maintaining the same border width between them.
5. Assembling the front piece
• Place the assembled blocks on a grid according to the defined layout.
• Carefully align the seams and pin them to keep the line straight.
• Join the horizontal lines first, then the vertical lines, so that the grid is uniform.
6. Preparing the batting and backing
• Cut the batting and backing with margins 2.5 cm larger than the quilt front.
• Place the backing down, the batting in the middle, and the quilt front on top (or use the “tray” technique with the backing horizontal).
7. Quilting (finishing stitching)
• Define the quilting pattern:
o Optional: straight stitches following the block seams.
o Or free-motion quilting with a smooth stitch that follows the curves of the patchwork.
• Quilt around each block, preserving the texture of the borders between blocks.
8. Finishing the edges
• Prepare the hem 2.5 cm wide or use 4 cm wide binding for a more handcrafted look.
• Fold the edge inwards and sew around the quilt, ensuring alignment.
9. Finishing Tips
• Choose thread colors that match the quilt’s color palette to avoid clashing with the overall look.
• Do small sewing tests on identical scraps to prevent puckering.
• Wash and iron the quilt carefully to soften it.