
Step-by-step instructions for making a creative patchwork cushion with a character
Below is a complete step-by-step guide for you to recreate a fun cushion with patchwork in denim, girl appliqués, and playful details.
1. Planning and materials
• Cushion size: choose a common size, for example 40 x 40 cm or 45 x 45 cm.
• Fabrics:
Outer fabric: recycled denim or denim fabric scraps with different washes.
Fabrics for the character: knit/felt/negative fabric for the girl (simple stitches to facilitate embroidery/appliqué).
Lining: soft cotton for the inside.
Floral appliqués/patterns: floral fabric for the girl’s dress, hat, and pocket.
Background with stars or texture: use denim patches with star prints.
• Filling: good quality polyester fiber.
• Details: large buttons (brown), hidden zipper (optional) for easy cleaning.
• Tools: sewing machine, thread matching the jeans, scissors, pins, tailor’s chalk, fabric folder, iron, finishing palette.
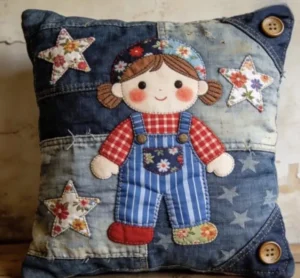
2. Layout Design and Planning
• Organize the layout with a large central figure (the girl) surrounded by patches and star/floral appliqués.
• Define the patch grid around the figure (e.g., 6 x 6 patches of 6 cm each for a 40 cm cushion).
• Plan the position of flower appliqués on stars and the small pockets on the clothing.
3. Cutting the Pieces
• Cut the cushion base: two 40 x 40 cm (or 45 x 45 cm) pieces for the front and back.
• Cut the denim scraps for the patchwork, maintaining variations in washes (light, medium, dark).
• Cut the girl’s pieces (head, hair, clothing, pocket, hat) with similar colors. Use felt or fabric as a base to facilitate smooth cutting.
• Cut out decorative patches (floral stars) and appliqué details (floral pocket, hat).
4. Assembling the center panel (character)
• Assemble the girl with appliqués on a specific square of denim fabric.
• Use an embroidery needle or straight stitch to attach each part, leaving smooth seams.
• Add a light outline with fine black or brown stitching to highlight features.
• Apply the floral pocket to the pants/overlock and the hat to the head using short stitches.
5. Assembling the background patchwork
• Assemble the denim patches around the character, creating a uniform mosaic.
• Align the edges with a ruler, pin, and sew each row of patches, forming a retro denim canvas.
• Add the flower/star appliqués to the patches, according to the layout.
6. Assembling the cushion
• Place the front (center panel with the character + patches) face up.
• Place the lining on the back and the stuffing between the two layers, aligning the edges.
• Sew the two parts together with perimeter stitches, leaving a 0.5-0.7 cm seam allowance.
7. Finishing
• Optional: add an invisible zipper on the side for easier washing of the cushion.
• Make a discreet hem around the cushion or sew a decorative outline with a zigzag stitch to reinforce it.
• Add large buttons to the top and bottom corners for a handcrafted touch.
8. Final Details
• Make small, simple embroideries on the patches to add more life (smiles, eyes, cheeks).
• Wash the cushion carefully before use to soften the fabric.
Quick Tips
• Vary denim washes for texture and depth.
• Use felt for small parts to make cutting and gripping easier.
• If you prefer, replace buttons with sewn-on patch ears for weight adjustment.
• Check the wash of the denim garment and choose dyes that don’t fade too much.