
Step-by-step instructions for making patchwork-style bags
Planning and materials:
Desired size: define the width and height (e.g., 20 x 14 cm for a small toiletry bag; 25 x 18 cm for a medium one).
*Fabrics:
Outer fabric: cotton or lightweight canvas with prints of your choice.
Lining fabric: plain cotton for the inside.
Visual filling fabric (optional): lightweight interfacing for firmness.
Patchwork and details: strips, small scraps, crocheted lace, ribbons, decorative buttons.
Zipper: length equal to or greater than the width of the final finish (e.g., 22 cm for a 20 cm piece).
*Finishing materials:
Thread matching the fabrics.
Flashlight, hand sewing needle, zipper needle.
Clothespins/tapes.
Scissors, ruler, fabric pencil.
Patchwork ruler or seam guides.
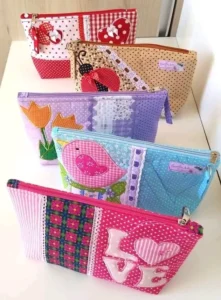
1- Layout Design and Planning
Divide the outer fabric into creative bottles:
Simple patchwork with strips, patchwork block, appliqué motifs.
Apply a central figure (e.g., heart, flower, birds) to evoke the style of the image.
Choose a coordinated color palette (pastel tones or vibrant colors, according to taste).
2- Cutting the Pieces
Cut the bag parts:
Main body: two pieces with the desired measurement.
Lining: two pieces with the same measurement as the main body.
Reinforcement/interfacing: if used.
Decorative details: strips, appliqués, lace appliqués, embroidery.
If you are doing patchwork, assemble the patchwork layout first and then weigh the main body.
3- Assembling the Exterior (Patchwork/Appliqué)
If you are using patchwork:
Sew the patches together to form the desired panel.
One panel to the outer fabric with continuous stitching.
Applications:
Pin and sew around with a straight or zigzag stitch.
Add lace or ribbon for texture.
Plan the thickness to avoid excessive bulk when finishing.
4- Zipper Preparation
The simplest method is finishing with an invisible zipper:
Position the zipper at the top, right sides together of the outer and lining fabrics.
Pin.
Sew a final 1-2 mm seam from the outer side.
Turn the fabric over and sew the second seam, forming a clean finish.
Alternatively, use the overlock stitching method or a suitable invisible zipper finish.
5- Bag Assembly
Place the pieces right sides together: outer front and back with the lining inside.
Basher the edges and sew around, leaving an opening of about 8-10 cm in the lining for turning.
Remove the inner hinges so that the zipper closes properly.
Turn, Fill, and Finish
Turn the bag right side out through the lining opening.
Close the opening with an invisible stitch.
Apply a small reinforcing stitch around the entire edge.
If desired, add a small snap hook or cord for hanging.
6- Decorative Finishes
Add labels, buttons, bows, or patches to personalize.
Add an extra detail with double stitching for added durability.
* Quick Tips:
Combine small patterns with solid colors to avoid looking too busy.
Use cotton lining fabric for easy washing.
Make a smaller version for use as a makeup or toiletries bag.