
Giant Dahlia Quilt
The Giant Dahlia Quilt is one of the most stunning patterns in traditional patchwork. Inspired by the delicate layers of the dahlia flower, it combines geometric petals, harmonious colors, and decorative quilting to create a sophisticated and dynamic piece.
In this tutorial, you will learn the detailed step-by-step process to create your own version of this beautiful quilt.
Project Level:
Intermediate to advanced.
Although it requires patience and precision, anyone dedicated can do it little by little.
Approximate Measurements:
You can adapt this to any size, but a measurement similar to the image would be:
• Double/Queen:
• Approximately 2.20 m × 2.40 m
Materials Needed
Fabric Selection Tips:
• Light lilac
• Dark purple
• Lavender
• White
• Lilac floral
• Small delicate prints
Approximate Quantity:
• 6 to 8 meters in total
Other Materials
• Acrylic or cotton batting
• Lining fabric
• Patchwork ruler
• Cutting mat
• Rotary cutter
• Iron
• Thread
• Sewing machine
• Pins
• Petal template
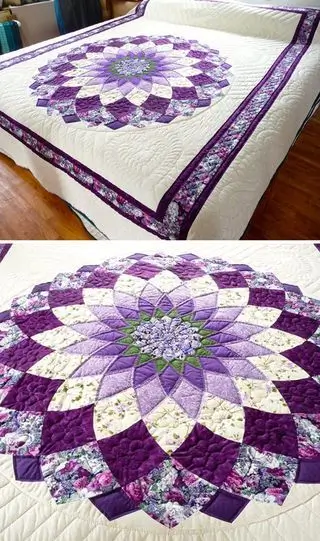
Understanding the Quilt Design
The pattern consists of:
1. Floral center
2. Layers of petals around it
3. Triangular blocks between the petals
4. Border External
5. Decorative Quilting
The secret to the effect lies in the repetition of the petals in circles.
1. Cutting the Pieces
For the petals
You will need to cut:
• Diamonds
• Triangles
• Elongated petal shapes
Suggestion:
Make templates out of cardstock to keep them all the same size.
Suggested initial measurements
Small petals:
• 6 cm × 18 cm
Medium petals:
• 8 cm × 22 cm
Large petals:
• 10 cm × 28 cm
2. Assembling the Flower Center
The center of the quilt is a small floral star.
Step by step:
1. Sew small diamonds together to form a circle
2. Join the pieces to form the central star
3. Iron carefully
Tip:
Always sew in pairs before joining everything.
3. First Layer of Petals
Now the larger petals begin.
How to make:
1. Sew two elongated pieces together to form a point.
2. Make several identical units.
3. Position them around the center. Ideally, assemble everything on a surface before sewing them together permanently.
4. Second Layer of Petals
This is where the mandala effect is created.
• Alternate:
• Dark purple
• Light lilac
• Floral
This creates depth and visual movement.
5. Joining the Circular Blocks
This step requires patience.
Recommended technique:
Sewing in segments
• Join smaller parts first.
• Then assemble quadrants.
• Finally, join everything together. This prevents distortions.
6. External Geometric Blocks
Around the mandala there are:
• Small squares
• Triangles
• Diamonds These help to “fit” the circle into the rectangular shape of the quilt.
7. Quilt Borders
Make:
Inner border
• Dark purple
Floral border
• Matching print
Final border
• Medium purple or white
8. Assembling the Sandwich
Assemble in this order:
1. Lining
2. Batting
3. Quilt top Pin everything very well.
9. Decorative Quilting
The quilting on this piece makes all the difference.
Suggestions:
• Curved quilting
• Arabesques
• Soft spirals
• Petal outline This highlights the mandala’s relief.
10. Finishing
• Trim excess fabric
• Apply bias tape
• Iron carefully
Important Tips:
– Work slowly
– Iron after each step
– Organize the pieces by color
– Take photos during assembly
– Use quality fabrics
Final Result
You will have an artistic and elegant quilt, with a sophisticated look and a beautiful three-dimensional floral effect. It’s a perfect piece to decorate bedrooms, give as a gift, or even participate in patchwork exhibitions.
Suggested Color Palette
Besides lilac, this pattern looks beautiful in:
• Blue and silver
• Sage green
• Rose and cream
• Wine red
• Earthy tones