
Patchwork Organizer Doll: Step-by-Step Tutorial
A fabric doll organizer is a charming handmade project that combines creativity, beauty, and practicality. It is perfect for keeping sewing supplies such as scissors, thread spools, pins, needles, and other small accessories neatly organized.
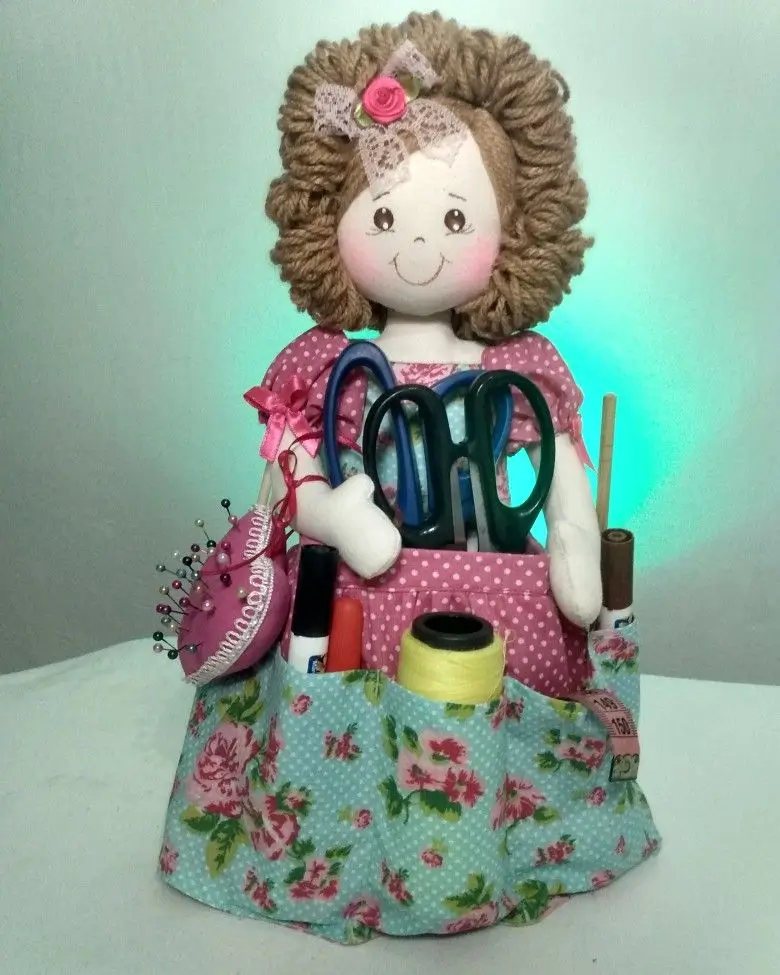
Inspired by traditional fabric dolls, this project features a cute face, yarn hair, a decorative dress, and a skirt with multiple pockets. You can customize the colors, patterns, and details to create a unique piece for your sewing room or as a thoughtful handmade gift.
Materials Needed
- Cotton fabrics in floral, polka-dot, and plaid patterns
- Skin-tone fabric for the doll’s face, arms, and legs
- Fabric for the dress and skirt pockets
- Polyester fiberfill stuffing
- Thick yarn for the doll’s hair
- Sewing thread and needles
- Sewing machine
- Fabric scissors
- Measuring tape and fabric marking pencil
- Paper for making patterns
- Lace, satin ribbons, buttons, and small decorative flowers
- Fabric paint or fabric markers for the face
- Sturdy cardboard or another suitable support for the skirt base
- Pins and other basic sewing supplies
Step-by-Step Instructions
Step 1: Prepare the Patterns
Draw paper patterns for the doll’s head, torso, arms, and legs. Create additional patterns for the dress, skirt, and organizer pockets. Adjust the dimensions according to the size you want for your finished doll.
Step 2: Sew and Stuff the Head
Transfer the head pattern onto skin-tone fabric. Cut out the pieces, sew around the edges, and leave a small opening. Turn the fabric right side out and fill it with polyester fiberfill until the head is firm and evenly shaped. Close the opening with small hand stitches.
Step 3: Create the Face and Hair
Draw the eyes, nose, and mouth using fabric paint or suitable fabric markers. Add a soft blush to the cheeks for a sweet appearance.
To make the hair, cut several lengths of thick yarn and attach them securely to the head. Arrange the yarn into curls, braids, or a full hairstyle. Finish with a ribbon or decorative flower.
Step 4: Make the Body, Arms, and Legs
Sew the body pieces together, then sew and stuff the arms and legs. Attach the limbs securely to the torso using reinforced stitches. Connect the head to the body, concealing the seams beneath the clothing whenever possible.
Step 5: Sew the Dress
Cut the fabric according to your doll’s measurements. Sew the bodice, sleeves, and skirt of the dress, then join the pieces together. Finish the edges neatly and decorate the outfit with lace, ribbons, or small bows.
Choose coordinating prints and colors to give your doll a charming handmade look.
Step 6: Create the Organizer Skirt
Cut a rectangle of patterned fabric and a matching piece of lining. Sew them together, leaving an opening to turn the fabric right side out. Create gathers or pleats as needed to shape the skirt.
Attach the skirt around the doll’s body, making sure it is secure.
Next, cut fabric pieces for the pockets in different sizes. Hem the top edges, fold the remaining edges inward, and sew the pockets onto the outside of the skirt. Add vertical stitching to divide larger pockets into smaller compartments for sewing tools.
Step 7: Reinforce the Base and Add Supplies
Add a sturdy, safely enclosed support to the bottom of the skirt so the doll can stand upright on a table. Make sure the base is stable and the support cannot come into direct contact with sharp tools.
Place scissors, thread spools, and other sewing accessories in the pockets. Distribute the weight evenly to help prevent the doll from tipping over.
Step 8: Add the Finishing Touches
Decorate the doll’s hair with a bow or flower and add any final details to the dress. Check all seams, reinforce any loose areas, and test the stability of the organizer before use.
Your handmade fabric doll organizer is now ready to display and enjoy!
Tips for a Beautiful Result
- Mix and match fabrics: Floral, polka-dot, and plaid prints look lovely together, especially in pink, mint green, beige, and cream.
- Vary the pocket sizes: Make narrow compartments for scissors and wider ones for thread spools and other supplies.
- Pay attention to finishing: Neat seams and carefully attached decorations give your project a more professional appearance.
- Prioritize safety: Store scissors and pins in appropriate compartments and keep the organizer out of reach of young children.
- Personalize your design: Experiment with different hairstyles, dress styles, colors, and embellishments to create your own unique doll.
A Creative and Practical Handmade Project
A fabric doll organizer is a wonderful way to use leftover fabric scraps while creating something both decorative and functional. Each doll can have its own personality through different fabrics, hairstyles, dresses, and pocket designs.
Whether you make one for your own sewing room, give it as a handmade gift, or create pieces to sell, this project combines imagination, craftsmanship, and everyday usefulness.
With a little patience and attention to detail, you can turn simple fabric scraps into a beautiful organizer that adds charm and personality to any sewing space.