
Patchwork Beetle Plush: A Step-by-Step Sewing Tutorial
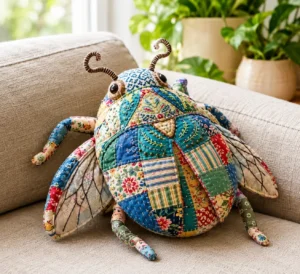
Turn colorful fabric scraps into an adorable patchwork beetle! This charming handmade project combines assorted prints, decorative embroidery, and delicate wings to create a unique stuffed insect with plenty of personality.
It is a wonderful way to reuse leftover fabrics while exploring different colors, textures, and hand-stitching techniques. The finished beetle makes a lovely decorative piece for a sofa, craft room, nursery, or handmade gift collection.
Materials Needed
-
Assorted cotton fabric scraps in different colors and prints
-
Beige or cream fabric for the wings
-
Fabric for the underside of the body
-
Lightweight quilt batting, if desired
-
Polyester fiberfill stuffing
-
Sewing thread in coordinating colors
-
Embroidery floss
-
Hand-sewing needles and embroidery needles
-
Sewing machine
-
Fabric scissors
-
Pins or sewing clips
-
Paper for making patterns
-
Safety eyes suitable for plush toys, or embroidery thread for stitched eyes
-
Measuring tape and fabric marking pencil
Safety tip: If the beetle is intended for a young child, use embroidered eyes and securely sewn details instead of buttons or small detachable decorations.
1. Create the Beetle Pattern
Start by drawing your pattern pieces on paper. The beetle will consist of several main parts:
-
One rounded, oval-shaped body
-
Head pieces
-
Two antennae
-
Six legs
-
Two side wings
-
Two upper shell panels that form the colorful patchwork body
For a medium-sized decorative beetle, you can make the body approximately 12 inches long and 9 inches wide, adjusting the other pieces proportionally.
Draw the shapes on paper first and check that the pieces fit together before cutting the fabric.
2. Prepare the Colorful Fabric Scraps
Choose cotton fabrics in shades of blue, green, red, yellow, cream, and other colors you love. Floral prints, stripes, checks, and small geometric patterns work especially well.
Cut the scraps into squares and rectangles of different sizes. They do not need to be identical, as the variety of shapes contributes to the handmade appearance.
Arrange the pieces on a flat surface, alternating light and dark fabrics to create an interesting balance of colors.
3. Assemble the Patchwork Panels
Place two fabric pieces right sides together and sew them using a seam allowance of approximately 1/4 inch.
First, join the small pieces into rows. Then sew the rows together to create a larger patchwork panel.
Press the seams with an iron to keep the fabric flat and make the next steps easier.
Continue adding scraps until the panel is large enough to accommodate both upper shell pieces.
For a look similar to the finished beetle, combine floral fabrics, stripes, checks, and solid colors.
4. Cut and Decorate the Beetle Shell
Place the shell pattern pieces on top of the patchwork panel and cut out the two upper body sections.
To make the shell more decorative, add hand embroidery using contrasting thread. You can create flowers, leaves, swirls, geometric shapes, or simple running stitches.
Attach the shell pieces to the body according to your pattern, leaving the necessary openings for assembly and stuffing.
Tip: Before sewing everything permanently, arrange the pieces on your work surface to check the color placement and symmetry.
5. Make the Side Wings
The wings can be made from light beige fabric, decorated with dark stitched lines that resemble the delicate veins of an insect’s wings.
Follow these steps:
-
Cut four wing-shaped pieces of fabric, two for each wing.
-
Place each pair right sides together.
-
Sew around the edges, leaving a small opening.
-
Turn the pieces right side out and close the openings with small stitches.
-
Add embroidered lines to create the appearance of wing veins.
For firmer wings, add a thin layer of batting or suitable interfacing.
Sew the wings securely to the sides of the body, making sure they are positioned evenly.
6. Make the Head and Antennae
Cut the head pieces from printed or solid fabric, following your pattern.
Place them right sides together, sew around the edges, and leave a small opening. Turn the piece right side out, add a little stuffing, and close the opening with an invisible stitch.
For the antennae, cut narrow strips of fabric, fold them lengthwise, and sew along the edges. Turn the strips right side out using an appropriate turning tool.
If desired, add a small amount of stuffing to give the antennae more structure. You can also use fabric-covered cords.
Attach the antennae securely to the head before completing the body assembly.
7. Sew the Six Legs
Cut six narrow strips of fabric to the desired length.
Fold each strip lengthwise with the right sides together and sew along the long edge. Turn each strip right side out, using a turning tool if necessary.
Choose different prints for the legs to coordinate with the patchwork shell.
Position three legs on each side of the body and sew them securely in place. Check that they are evenly spaced and that the beetle sits in a balanced position.
8. Assemble and Stuff the Body
Arrange the body pieces according to your pattern. Position the head, legs, and wings carefully before sewing.
Check that all the details face the correct direction and that the seams are secure.
Gradually fill the body with polyester fiberfill, distributing the stuffing evenly to create a rounded shape without making the beetle too stiff.
Close the opening with small, neat stitches. Gently shape the body with your hands to achieve the desired appearance.
9. Add the Finishing Details
Now it is time to give your beetle its own personality!
Consider adding:
-
Embroidered eyes
-
Small floral motifs on the shell
-
Decorative running stitches in contrasting colors
-
Tiny stitched patterns on the wings
-
Embroidered details on the antennae and legs
The details do not have to be perfect. One of the most appealing aspects of patchwork is the character created by combining different fabrics and handmade embellishments.
10. Finish and Display Your Beetle
Inspect all the seams, trim loose threads, and adjust the wings, antennae, and legs.
If the beetle is intended as a decorative piece, place it on a sofa, armchair, bed, or shelf. It can also make a thoughtful handmade gift for someone who loves nature, insects, or creative sewing projects.
Tips for a Beautiful Result
-
Use small scraps: Even tiny fabric leftovers can become part of a colorful shell.
-
Mix different prints: Florals, stripes, checks, and solids create an interesting patchwork effect.
-
Experiment with embroidery: Contrasting stitches help highlight individual fabric pieces.
-
Choose durable fabrics: Good-quality cotton is easy to sew and helps the toy maintain its shape.
-
Personalize your design: Try different color combinations to create beetles with completely different looks.
Conclusion
Creating a patchwork beetle is a fun way to transform leftover fabrics into a unique handmade decoration. With careful stitching, colorful scraps, and a few embroidered details, you can make a charming stuffed insect full of character.
The best part is that every beetle can look different depending on the fabrics and embellishments you choose. Gather your favorite scraps, prepare your sewing machine, and enjoy bringing your own little patchwork creature to life!