
How to Make a Bookcase Quilt
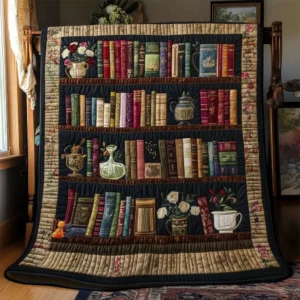
The Bookcase Quilt is one of the most charming patterns in creative patchwork. Inspired by antique bookshelves, this quilt blends literature, vintage decor, and artistic quilting into a piece full of personality. This pattern has a sophisticated style, with books in classic tones, decorative flowers, vases, and embroidered details that create the effect of a truly welcoming library.
Project Level:
Intermediate.
Ideal for those who already know straight stitching and want to explore creative applications and assembly.
Suggested Size:
You can easily adapt it, but the model in the image appears to be approximately:
• 1.60 m × 2.10 m
Materials Needed:
Fabrics
For the books:
• Assorted scraps
• Vintage prints
• Earth tones
• Wine red
• Moss green
• Petrol blue
• Beige
• Gold
For the background:
• Black
• Dark navy blue
For the frames:
• Delicate floral
• Light beige
Other materials:
• Acrylic batting
• Quilt lining
• Patchwork ruler
• Cutting mat
• Rotary cutter
• Scissors
• Iron
• Thread
• Sewing machine
• Temporary fabric glue (optional)
• Heat-sealable paper for appliqués
Quilt Structure
The quilt consists of:
1. Horizontal shelves
2. Vertical books of varying sizes
3. Decorative objects
4. Quilted edges
5. Decorative quilting
1. Planning the Bookshelf
Before sewing:
Make a simple sketch:
• How many shelves will it have?
• How many books per row?
• Where to place vases and flowers
Tip:
Mix different heights to make it look more realistic.
2. Cutting the Books
Each book is a simple rectangle.
Suggested measurements:
Narrow books:
• 4 × 18 cm
Medium books:
• 6 × 20 cm
Wide books:
• 8 × 24 cm
How to make it realistic
Mix:
• Patterned fabrics
• Plain fabrics
• Different textures
Some books can be:
• Tilted
• Stacked
• Taller
3. Sewing the Books
1. Join the rectangles side by side
2. Iron
3. Form horizontal blocks
Important:
Leave small differences in height to create a natural look.
4. Creating the Shelves
The shelves are horizontal strips.
Cut:
• Brown strips or faux wood
• About 5 to 8 cm wide
Sew between the rows of books.
5. Decorative Applications
The charm of this quilt lies in the details.
You can add:
• Vases
• Flowers
• Mugs
• Small pictures
• Teapots
• Plants
Recommended technique:
Iron-on adhesive application
1. Draw the template
2. Cut it out of the fabric
3. Iron it
4. Sew around with a decorative stitch
6. Dark Background
The black or navy blue background makes the books stand out.
Sew:
• Blocks of books onto the dark background
• Keeping the margins even
7. Complete Assembly
Now join:
• All the shelves
• Rows
• Decorative objects
Assemble everything like a large panel.
8. Quilt Borders
Inner border:
• Dark
Outer border:
• Delicate floral
Quilted border:
• Light beige
This creates a classic and elegant finish.
9. Assembling the Sandwich
Assemble in this order:
1. Lining
2. Batting
3. Quilt top
Pin well.
10. Decorative Quilting
Quilting adds depth to the piece.
Suggestions:
• Vertical lines on the books
• Soft waves in the background
• Quilting around the flowers
11. Final Touches
• Trim excess fabric
• Apply bias tape
• Iron carefully
Important Tips
– Mix prints
– Use fabrics with an antique look
– Make the books slightly crooked to look realistic
– Photograph the layout before sewing
– Work on one shelf at a time
Creative Ideas
You can personalize it with:
• Favorite books
• Embroidered names
• Literary quotes
• Mini cats among the books
• Embroidered lights
• Vintage flowers
Final Result
You will have a sophisticated, cozy quilt full of personality, perfect for lovers of books, vintage decor, and artistic patchwork.
This is a piece that draws attention for its rich details and the welcoming look of a true fabric library.