
Decorative Patchwork Wall Hanging
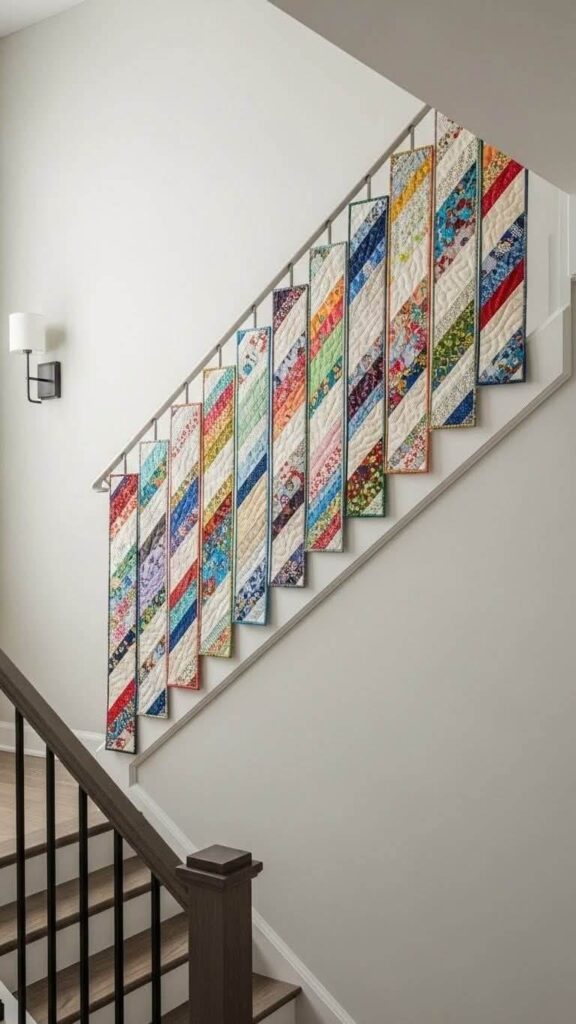
This decorative wall hanging is a modern, creative piece made from vertical patchwork strips—ideal for adorning walls along staircases, hallways, or living rooms. The visual effect is striking because each strip varies in length, mirroring the shape of the staircase.
Even beginners to patchwork can create this project, as it primarily involves straight seams and the use of fabric scraps.
Materials Needed
Fabrics
• Assorted cotton patchwork scraps
• Neutral fabric (beige, unbleached/natural, or light gray)
• Backing fabric
• Thin acrylic batting (R1 or R2)
Tools
• Cutting mat
• Patchwork ruler
• Rotary cutter
• Scissors
• Iron
• Sewing machine
• Pins or clips
• Rod for hanging curtains or wall hangings
• Metal rings or hanging loops
Project Measurements
You can adjust the measurements to fit your space.
| Strip | Width | Height |
| 1 | 12 cm | 50 cm |
| 2 | 12 cm | 70 cm |
| 3 | 12 cm | 90 cm |
| 4 | 12 cm | 110 cm |
| 5 | 12 cm | 130 cm |
| 6 | 12 cm | 150 cm |
| 7 | 12 cm | 170 cm |
The “staircase” effect is created by gradually increasing the height of each panel.
Step 1 – Sorting Scraps
Choose fabrics that coordinate well with each other.
The piece in the photo uses:
• Florals
• Batiks
• Geometric prints
• Fabrics with small motifs
• Vibrant tones
The variety of prints is what gives the work its personality.
Step 2 – Cutting Triangles
The design is formed by triangles sewn together diagonally. Cutting:
• 8 cm x 8 cm squares
Then, cut each square diagonally.
You will get two triangles per square.
Make approximately:
• 120 to 150 assorted triangles
Step 3 – Assembling the Strips
Start by joining the triangles.
How to do it:
1. Take two different triangles.
2. Sew them right sides together.
3. Press the seam with an iron.
Repeat until you form a diagonal sequence.
The result will look like a chain of colorful diamonds.
Step 4 – Creating Long Strips
Now, join several blocks together.
Assemble diagonal rows with:
• 6 to 8 triangles for the shorter strips.
• 15 to 20 triangles for the longer ones.
Each strip should maintain approximately the same width.
Step 5 – Finishing the Edges
After assembling each strip:
1. Trim the edges using a ruler.
2. Ensure they all have a uniform width.
3. Press again with an iron.
This ensures a professional finish.
Step 6 – Preparing the Quilt Sandwich
Assemble each panel separately.
Layers:
1. Top fabric (patchwork)
2. Batting
3. Backing fabric
Pin everything together.
Step 7 – Quilting
Quilt the piece to enhance the work.
Suggestions:
Straight-line quilting
Parallel stitches following the diagonal lines.
Free-motion quilting
Soft, curved designs.
Stitch-in-the-ditch
Stitching exactly along the seam lines.
For beginners, straight-line quilting is the simplest option.
Step 8 – Attaching the Binding
Cut strips that are:
• 4 cm wide
Sew them around each panel.
Fold to the back and finish with an invisible stitch or by machine.
Step 9 – Making the Loops
Create small loops at the top of each strip.
Cut:
• 8 cm x 12 cm strips
Fold:
1. In half.
2. Sew.
3. Turn right side out.
Stitch at the top.
Make two loops per strip.
Step 10 – Wall Mounting
Slide a metal rod through the loops.
Arrange the strips from shortest to longest.
The result creates a cascading effect similar to the one in the photo.
Tips for an Even More Beautiful Result
Arrange by color
Create a gradient:
• Blue → Green → Pink → Purple
Use themed fabrics
• Christmas
• Spring
• Sewing
• Butterflies
• Flowers
Add details
• Decorative buttons
• Embroidery
• Small appliqués
Mix textures
Combine:
• Cotton
• Linen
• Lightweight denim
Final Result
You will have an elegant, colorful decorative panel that is perfect for enhancing staircases and empty walls. Beyond making use of fabric scraps, this piece becomes a true work of textile art, capable of adding personality and coziness to any room.