
Christmas Patchwork Table Topper with a Snowman: Step-by-Step Tutorial
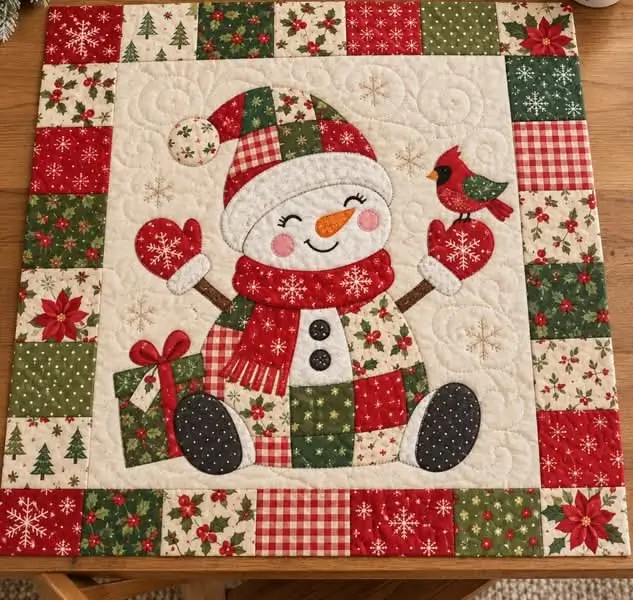
A Christmas table topper made from fabric scraps is a lovely way to decorate your home for the holiday season. Inspired by the design in the image, this project combines red, green, and festive printed fabrics with a charming patchwork snowman appliqué, creating a handmade decoration full of warmth and Christmas spirit.
Materials Needed
-
Assorted cotton fabric scraps in red, green, white, cream, and Christmas prints.
-
Cream or white fabric for the center panel.
-
Thin quilt batting.
-
Fabric for the backing.
-
Sewing thread in coordinating colors.
-
Fusible interfacing for the appliqué pieces.
-
Fabric scissors.
-
Patchwork ruler and rotary cutter, if available.
-
Sewing pins or clips.
-
Sewing machine.
-
Iron.
-
Snowman pattern pieces for the body, hat, scarf, mittens, nose, and presents.
-
Black buttons or black fabric for the snowman’s eyes and buttons.
1. Choose the Table Topper Size
For your first project, you can make a square table topper measuring approximately 24 × 24 inches, perfect for a small table or as a centerpiece.
You can increase or decrease the measurements depending on the size of your table.
Plan three main sections:
-
Center panel: A light-colored background to highlight the snowman.
-
Patchwork border: A frame made from squares of Christmas fabrics.
-
Finishing: Batting, backing fabric, and binding around the edges.
2. Cut the Fabrics
Sort your fabrics by color and print. To recreate the colorful look in the inspiration photo, combine snowflake prints, Christmas trees, poinsettias, gingham, and polka dots.
Cut one large square of cream fabric for the center panel. Then cut smaller squares from assorted Christmas fabrics to create the border.
For example, you can use 4 × 4-inch squares, including seam allowances. Adjust the number of squares according to your desired table topper size.
Press all the fabric pieces with an iron before sewing.
3. Assemble the Patchwork Border
Arrange the squares around the center panel, alternating red, green, cream, and gingham fabrics.
Sew the squares together in rows using a seam allowance of approximately ¼ inch. Press the seams flat with an iron.
Prepare the border strips for all four sides and sew them around the center panel, carefully aligning the edges.
Tip: Before sewing, arrange all the squares on a table. This allows you to move the prints around until you find a color combination you love.
4. Prepare the Snowman Appliqué
The snowman will be the main feature of your table topper.
Draw or print separate templates for each part:
-
Snowman’s body and head;
-
Christmas hat;
-
Scarf;
-
Carrot-shaped nose;
-
Eyes and mouth;
-
Mittens or hands;
-
Buttons;
-
A small bird and fabric presents, if you want to recreate the details of the inspiration design.
Trace the templates onto your chosen fabrics and cut out each piece.
To make the process easier, use fusible interfacing according to the manufacturer’s instructions. This helps hold the appliqué pieces in place before stitching.
5. Arrange the Snowman on the Center Panel
Position the snowman’s pieces on the cream fabric, starting with the body and head. Add the hat, scarf, nose, and remaining details.
Before attaching anything, check that the design is centered and that there is enough space between the snowman and the patchwork border.
Once you are happy with the arrangement, fuse the appliqué pieces in place if your interfacing allows it.
Stitch around the edges using a narrow satin stitch, blanket stitch, or decorative stitch. For small details such as the mouth and eyebrows, you can use hand embroidery.
6. Add the Christmas Details
To make your table topper even more charming, add a red-and-green bird, small patchwork presents, or hearts beside the snowman.
Choose prints that coordinate with the border without overcrowding the design.
Buttons can be attached after quilting is complete, especially if you want to avoid flattening or damaging them during machine stitching.
7. Prepare the Quilt Sandwich
Now it is time to assemble the three layers of your patchwork table topper:
-
Place the backing fabric on a flat surface with the right side facing down.
-
Lay the batting on top.
-
Place the completed patchwork panel over the batting, with the right side facing up.
-
Smooth all three layers and secure them with quilting pins or clips.
Check carefully for wrinkles before beginning the quilting process.
8. Quilt the Table Topper
Stitch through all three layers to give the table topper structure and texture.
You can sew straight lines along the border and decorative curves around the snowman. Snowflakes, swirls, and small circles are wonderful quilting designs for this Christmas project.
If you are new to patchwork, choose simple straight-line quilting. The most important thing is to keep the layers secure and prevent the fabric from bunching or wrinkling.
9. Finish the Edges
Trim away the excess batting and backing, making sure all the edges are even.
Cut fabric strips for the binding, joining them together if necessary. Sew the binding around the table topper, fold it over to the opposite side, and finish stitching by machine or by hand.
Press the finished piece carefully and check that all the appliqué details are securely attached.
10. Enjoy Your Christmas Decoration
Your Christmas patchwork table topper is now complete! It can decorate your dining table, a side table, or a console during the holiday season.
The best part of this project is that you can customize every detail: change the colors, add other Christmas characters, or use fabric scraps you already have at home.
Final tip: To achieve a look similar to the inspiration photo, combine a cream background with red and green fabrics and a snowman decorated with colorful details. The result will be cheerful, cozy, and full of the special charm of Christmas.