
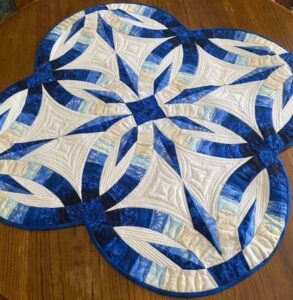
Pattern: Mom’s Bali Wedding Star, Step-by-Step for Beginners
This quilt combines star-shaped blocks with vibrant fabrics, creating an elegant and harmonious effect.
Materials Needed:
Main fabrics (3 to 5 different colors – contrast is important)
Background fabric (light or neutral)
Acrylic or cotton batting
Lining fabric
Patchwork ruler
Cutting mat
Round cutter
Sewing machine
Iron
Pins or clips
Sewing thread
Suggested Measurements:
Final block: 30 cm x 30 cm
Quilt: 4 x 4 blocks (approx. 120 cm x 120 cm)
1. Cutting the Fabrics
You will work with basic shapes:
Cut:
Squares: 20 cm (base of the blocks)
Rectangles: 10 x 20 cm
Triangles (to form the star)
Tip: Use contrasting fabrics to highlight the star design.
2. Assembling the Star Points
The “Wedding Star” effect comes from the points:
Take a square for the bottom.
Position a smaller colored square in one corner.
Sew diagonally.
Cut off the excess and iron.
Repeat the necessary corners → this forms the triangles that create the star.
3. Block Construction
Each block is assembled in parts:
Make 4 units with points (corners of the star).
Make 4 side pieces (rectangles or strips).
Assemble the center (it can be a square or a combination).
Assembly:
One in rows.
Then sew the rows together.
Important: Always iron after each seam.
4. Quilt Assembly
Join all the blocks forming lines. Match the lines to each other. Add borders (optional, but recommended to enhance the design).
5. Assembling the “Sandwich”
Layers: Top (star part)
Battery
Backing
Pin well. Quilt (decorative stitching).
For beginners: sew in straight lines following the design.
6. Finishing
Trim the excess. Make a slit on the edges. Iron the piece well.
Tips for Beginners:
Start with a few blocks for practice. Use fabrics that contrast well. Sew a 0.75 cm seam allowance. Don’t skip the ironing—it makes a HUGE difference. Test one block before making the entire quilt.
Result:
You will have an elegant star-effect quilt with movement and depth—perfect for gifting or decorating with style!