
“Cleopatra’s Fan” Quilt – Complete Step-by-Step Guide for Beginners
“Cleopatra’s Fan” is one of the most elegant blocks in traditional patchwork. Its design resembles an open fan or a seashell, formed by overlapping arcs that create a delicate, sophisticated effect. Although it looks complex, it can be made by beginners using templates and sewing each part separately.
In this tutorial, you will learn how to assemble each block and then join them all together to create a beautiful quilt.
Difficulty Level
Intermediate (a dedicated beginner can manage it by taking their time)
Approximate Time:
• Each block: 1 to 2 hours
• Complete quilt: 25 to 40 hours
Materials
Fabrics
• Light-colored fabric (background)
• Assorted patterned fabrics
• Solid fabrics for contrast
• Border fabric
• Backing fabric
Tools
• Sewing machine
• 100% cotton thread
• Iron
• Patchwork ruler
• Cutting mat
• Rotary cutter
• Template paper
• Scissors
• Pins
• Temporary glue stick (optional)
Quilt Dimensions
A double-size quilt can be made with:
• 30 blocks
• Each block measures approximately 30 x 30 cm
Finished size:
180 x 210 cm
Block Structure
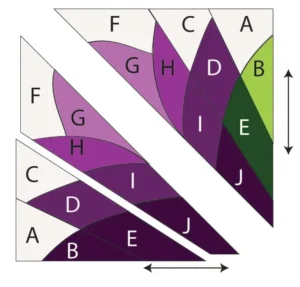
Each block consists of:
• 5 fan “blades”
• 1 outer arc
• 1 rounded center
• 1 background piece
Visually, it resembles an open fan.
Choosing Colors
A good combination is:
• Cream background
• Fans in gradient tones
• Contrasting center
Another option:
• Blue
• Turquoise
• Green
• Lilac
Or vintage floral fabrics.
Step 1 – Make the Templates
You will need four templates:
Template A
The fan blades.
Shape:
A slightly curved petal.
Make five units.
Template B
The outer arc.
It follows the curve of the fan.
One unit.
Template C
The center.
A small, rounded piece.
One unit.
Template D
Block background.
Two mirror-image pieces.
Step 2 – Cut the Fabrics
For one block, cut:
• 5 pieces A
• 1 piece B
• 1 piece C
• 2 pieces D
Always add a 0.75 cm seam allowance.
Step 3 – Assemble the Fan
Join two blades.
Sew.
Press the seam open.
Add the third.
Then the fourth.
And finally, the fifth.
The fan is now complete.
Press with an iron.
Step 4 – Sew the Center
Position the fan center.
Align carefully.
Sew slowly.
Since there are curves, make small snips in the seam allowance (without cutting the seam itself).
Press again.
Step 5 – Add the Arc
Now sew the outer arc.
Join the middle first.
Then secure the ends.
Sew slowly.
Avoid pulling the fabric.
Press again.
Step 6 – Sew the Background
Now join one side of the background.
Then the other.
Your square block will begin to take shape.
Press carefully.
Step 7 – Square Up the Block
Use a ruler.
Make all blocks exactly the same size.
This will make assembling the quilt much easier.
How Many Blocks to Make?
For a double-size quilt:
• 5 blocks across
• 6 blocks down Total:
30 blocks
Color Planning
Lay out all the blocks on a table.
Swap positions.
Mix:
• lights
• darks
• florals
• solids
Take a photo before assembly.
Step 8 – Join the Blocks
Sew into rows first.
Press all seams.
Then join the rows together.
Check alignment constantly.
Step 9 – Borders
A suggestion:
First border:
6 cm in light fabric.
Second border:
12 cm in patterned fabric.
This highlights the fan design.
Step 10 – The Quilt Sandwich
Assemble in this order:
1. Backing fabric
2. Batting
3. Quilt top
Secure everything with safety pins or basting stitches.
Step 11 – Quilting
You can quilt:
• following the fan arcs;
• outlining each blade;
• making curved lines around the blocks;
• using free-motion quilting to create texture.
This type of quilting further enhances the pattern’s elegant effect.
Step 12 – Finishing
Trim the excess batting.
Make the binding using strips approximately 6 cm wide.
Sew around the entire quilt.
Finish by hand or machine.
Tips for Beginners
• Label each template with letters (A, B, C, and D).
• Sew test blocks first using scraps.
• Press with an iron after every seam.
• Use plenty of pins on curved sections to prevent shifting.
• Don’t rush: curves require slow sewing for a precise result.
Final Result
The Cleopatra’s Fan quilt combines elegant curves, movement, and a classic look that never goes out of style. With well-chosen fabrics and attention to… …details, each block transforms into a small work of art. Although it requires a bit more care than straight-edged blocks, the result rewards the effort: a sophisticated, cozy quilt that is perfect for decorating any room or becoming a special handmade keepsake.