
How to Make a Patchwork Shawl from Fabric Scraps
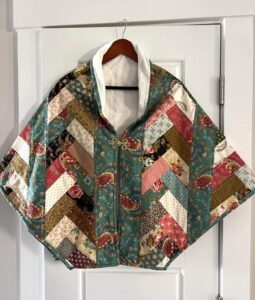
A patchwork shawl is a beautiful way to transform leftover fabric into a cozy and stylish garment. The shawl shown in the photo features a strip patchwork design, where fabric strips are sewn together diagonally to create a classic herringbone-style pattern. Finished with a soft lining and a standing collar, it is perfect for cool autumn and winter days.
This tutorial will guide beginners through every step of the process.
Skill Level
Beginner to Intermediate
Approximate sewing time:
- Cutting: 1–2 hours
- Piecing the patchwork: 2–3 hours
- Assembly and finishing: 2 hours
Total: 5–7 hours
Finished Size
Approximately:
- Width: 58 inches (147 cm)
- Length: 28 inches (71 cm)
You may easily adjust the measurements to your preference.
Materials
Fabrics
- Assorted cotton fabric scraps
- Coordinating floral prints
- Vintage-style prints
- Neutral cream fabrics
- One large backing fabric
- Soft fleece, flannel, or cotton batting
- Lining fabric (cotton or flannel)
Supplies
- Sewing machine
- Rotary cutter
- Cutting mat
- Quilting ruler
- Fabric scissors
- Pins or sewing clips
- Iron
- Thread
- Measuring tape
- Fabric marker
Step 1 – Select Your Fabric Palette
Choose fabrics that coordinate well together.
For a vintage-inspired shawl like the photo, use:
- Dusty teal
- Burgundy
- Cream
- Olive green
- Soft pink
- Floral prints
- Paisley fabrics
Mix:
- Small floral prints
- Tiny geometric prints
- Tone-on-tone fabrics
- Medium-scale patterns
The more variety you use, the richer the finished design will appear.
Step 2 – Cut the Fabric Strips
Cut strips measuring:
2½ inches (6.5 cm) wide
Length may vary depending on your fabric scraps.
Prepare approximately:
- 60–80 strips
Press every strip before sewing.
Step 3 – Arrange the Design
Lay the strips on a large table.
Alternate:
- Light
- Medium
- Dark
Avoid placing identical prints next to one another.
Rotate strips until you are happy with the overall balance.
Take a photo before sewing.
Step 4 – Sew the Patchwork Panels
Place two strips right sides together.
Sew using a:
¼-inch seam allowance
Press seams open or to one side.
Continue adding strips one at a time until you create a large fabric panel.
Step 5 – Create the Diagonal Layout
The shawl in the photo features diagonal strip sections.
To achieve this effect:
Cut your completed strip panel into wide diagonal sections.
Rotate every other section 180 degrees.
Arrange them into a chevron or herringbone layout.
Sew the sections together carefully.
Press all seams flat.
Step 6 – Cut the Shawl Shape
Fold the patchwork panel in half.
Using a large piece of paper, create a rounded shawl pattern.
Typical measurements:
- Neck opening: 8–9 inches
- Shoulder width: 18–20 inches
- Rounded front edges
Pin the pattern onto the fabric.
Cut carefully.
Step 7 – Prepare the Lining
Place the finished patchwork on top of the lining fabric.
Cut an identical piece.
If desired, also cut:
- Cotton batting
- Lightweight fusible fleece
for added warmth.
Step 8 – Quilt the Layers
Layer:
- Patchwork top
- Batting
- Lining
Pin thoroughly.
Quilt by sewing:
- Straight lines
- Diagonal lines
- Gentle curves
This stabilizes the fabric while adding texture.
Step 9 – Make the Collar
Cut a rectangle approximately:
- 5 inches wide
- Long enough to fit around the neckline
Fold in half lengthwise.
Sew the short ends together.
Attach the collar to the neckline.
Topstitch neatly.
Step 10 – Finish the Edges
You can finish the outer edges using:
Option 1
Bias binding
Option 2
Turn the edges inward twice and topstitch.
Option 3
Sew patchwork and lining right sides together, then turn the shawl right side out for a clean finish.
Step 11 – Add the Closure
The shawl in the photo uses a decorative frog closure.
Other options include:
- Wooden toggle buttons
- Large decorative buttons
- Magnetic clasp
- Ribbon ties
- Vintage brooch
Position the closure comfortably near the neckline.
Optional Embellishments
To personalize your shawl, consider adding:
- Decorative hand embroidery
- Lace trim
- Decorative quilting
- Appliqué flowers
- Handmade fabric labels
- Vintage buttons
Helpful Tips for Beginners
- Press every seam before adding the next strip.
- Keep a consistent ¼-inch seam allowance.
- Mix solids with prints for visual balance.
- Sew slowly when joining diagonal sections.
- Lay the project flat often to check alignment.
- Label your strip sections before assembling.
Fabric Suggestions
This project is ideal for using leftover fabrics from previous quilting projects, including:
- Quilt scraps
- Fat quarters
- Jelly roll strips
- Vintage cotton fabrics
- Floral collections
- Reproduction fabrics
Final Thoughts
A patchwork scrap fabric shawl is both practical and artistic. By combining colorful fabric strips into a diagonal patchwork design, you can create a warm, elegant garment that showcases your creativity while making excellent use of fabric leftovers. Each shawl is unique, telling its own story through color, texture, and pattern—making it a timeless handmade accessory you’ll enjoy wearing for many years.