
How to Make a Folded Star Patchwork Quilt
The Folded Star is one of the most eye-catching quilt block designs because it creates a beautiful three-dimensional (3D) effect using folded fabric instead of traditional piecing. The layered “petals” form a striking star or flower, adding texture and depth to any quilt. Although it looks intricate, the construction is surprisingly beginner-friendly when broken down into simple steps.
This tutorial explains how to make individual Folded Star blocks and assemble them into a beautiful quilt.
Skill Level
Beginner to Intermediate
Time Required:
One block: 1–2 hours
Lap quilt: 20–30 hours
Queen-size quilt: 40–60 hours
Finished Quilt Size
This tutorial uses:
Block size: 12 × 12 inches (30 × 30 cm)
Layout: 5 × 6 blocks
Finished quilt:
Approximately 60 × 72 inches (152 × 183 cm)
Materials:
Fabrics:
Background fabric
Coordinating solid fabrics
Floral prints
Accent fabrics
Border fabric
Backing fabric
Cotton batting
Tools:
Sewing machine
Rotary cutter
Cutting mat
Quilting ruler
Fabric scissors
Iron
Pins or fabric clips
Fabric marker
Hand-sewing needle
Matching thread
Understanding the Folded Star
Unlike traditional patchwork blocks made from sewn pieces, the Folded Star is built by folding fabric squares into triangular “petals.”
These folded units are layered in circles around a central point, producing the beautiful raised effect.
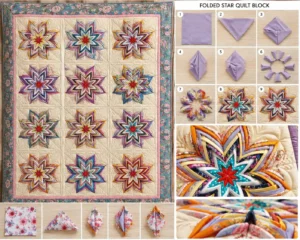
Step 1 – Choose Your Color Palette
The Folded Star shines when colors gradually transition.
Example palette:
Cream
Yellow
Soft lavender
Orange
Navy
Turquoise
Red center
Mix floral prints with solids for added depth.
Step 2 – Cut the Fabric Squares
For one 12-inch block, cut:
Base
1 square
12½ × 12½ inches
Folded Pieces
Prepare approximately:
32–40 fabric squares
3½ × 3½ inches each
Divide the colors into four groups to create concentric layers.
Step 3 – Press Every Square
Iron every square carefully.
Accurate pressing makes folding easier and improves the final appearance.
Step 4 – Fold the Squares
Take one square.
Fold it in half diagonally to make a triangle.
Press.
Fold the two corners toward the center to form a kite shape.
Press again.
Each folded piece becomes one “petal.”
Repeat until all petals are prepared.
Step 5 – Mark the Center
Fold the base square in half vertically.
Press lightly.
Fold horizontally.
Press again.
The intersecting creases indicate the exact center.
Step 6 – Create the First Star Layer
Position four folded petals around the center.
Each point should meet neatly in the middle.
Pin securely.
Check that spacing is even before stitching.
Step 7 – Add the Second Layer
Place another ring of folded petals.
Offset each petal between those of the first layer.
This creates the layered star effect.
Pin each piece before sewing.
Step 8 – Continue Building the Star
Add additional layers one at a time.
Alternate colors to create depth.
Typical arrangement:
Layer 1: Red
Layer 2: Turquoise
Layer 3: White
Layer 4: Navy
Layer 5: Yellow
Layer 6: Lavender
Layer 7: Orange
Each new layer should overlap the previous one by about one-third of the petal.
Step 9 – Secure the Layers
Once all petals are positioned:
Sew around the block approximately:
¼ inch from the raw edge.
This temporary stitching holds everything together.
The final quilting stitches will permanently secure the folded layers.
Step 10 – Trim the Block
Square the block to:
12½ × 12½ inches.
All blocks must be identical for accurate assembly.
Step 11 – Make Additional Blocks
For a throw quilt:
20 blocks
For a queen-size quilt:
30–42 blocks
Arrange the colors before sewing rows together.
Step 12 – Assemble the Quilt Top
Sew blocks into horizontal rows.
Press seams between each row.
Join all rows carefully, matching corners.
Step 13 – Add Borders
Suggested borders:
Inner border:
2 inches
Outer border:
5 inches
Choose fabrics that complement the star without overwhelming it.
Step 14 – Build the Quilt Sandwich
Layer in this order:
Backing fabric
Batting
Quilt top
Smooth out wrinkles.
Pin or baste securely.
Step 15 – Quilt the Layers
Quilt carefully around the folded petals rather than stitching directly across them.
Popular quilting designs include:
Echo quilting
Curved lines
Swirls
Feather motifs
Straight-line quilting in the background
These designs emphasize the raised texture of the Folded Star.
Step 16 – Bind the Quilt
Trim excess batting and backing.
Prepare binding strips about 2½ inches wide.
Attach the binding around the entire quilt.
Finish by hand or machine.
Tips for Beginners:
• Use starch before folding for crisp, sharp petals.
• Keep all folds identical for a symmetrical star.
• Press after every fold.
• Pin generously before sewing.
• Test one practice block before making the entire quilt.
• Photograph your layout before stitching to preserve your design.
Fabric Suggestions:
This pattern looks beautiful with:
• Batik fabrics
• Reproduction prints
• Floral cottons
• Holiday fabrics
• Ombre collections
• Jelly roll leftovers cut into squares
• Scrap fabrics from previous quilting projects
Final Thoughts:
The Folded Star Quilt is a timeless patchwork design that transforms simple fabric squares into an elegant three-dimensional work of art. Its folded petals create depth, texture, and movement, making every block a stunning focal point. Whether you use coordinated fabrics or colorful scraps, each Folded Star quilt is unique, showcasing both precision and creativity. With patience and careful folding, even beginners can create a quilt that looks intricate, sophisticated, and beautifully handcrafted.