
Patchwork Top: Step-by-Step Guide to Making a Unique Handmade Garment
Turning small fabric scraps into a beautiful piece of clothing is a creative way to reuse materials and make something truly unique. Inspired by the tops shown in the image, this project combines a solid-color base with colorful patchwork sleeves and details, creating a cheerful and handmade look.
Materials Needed
- 1 existing top to use as a reference or a sewing pattern;
- Fabric for the main body of the top;
- Assorted cotton fabric scraps;
- Sewing thread;
- Sewing machine;
- Fabric scissors;
- Sewing clips or pins;
- Ruler and fabric chalk or fabric marker;
- Pattern paper;
- Iron;
- Interfacing, if needed;
- Elastic or a drawstring for the waist, depending on the design.
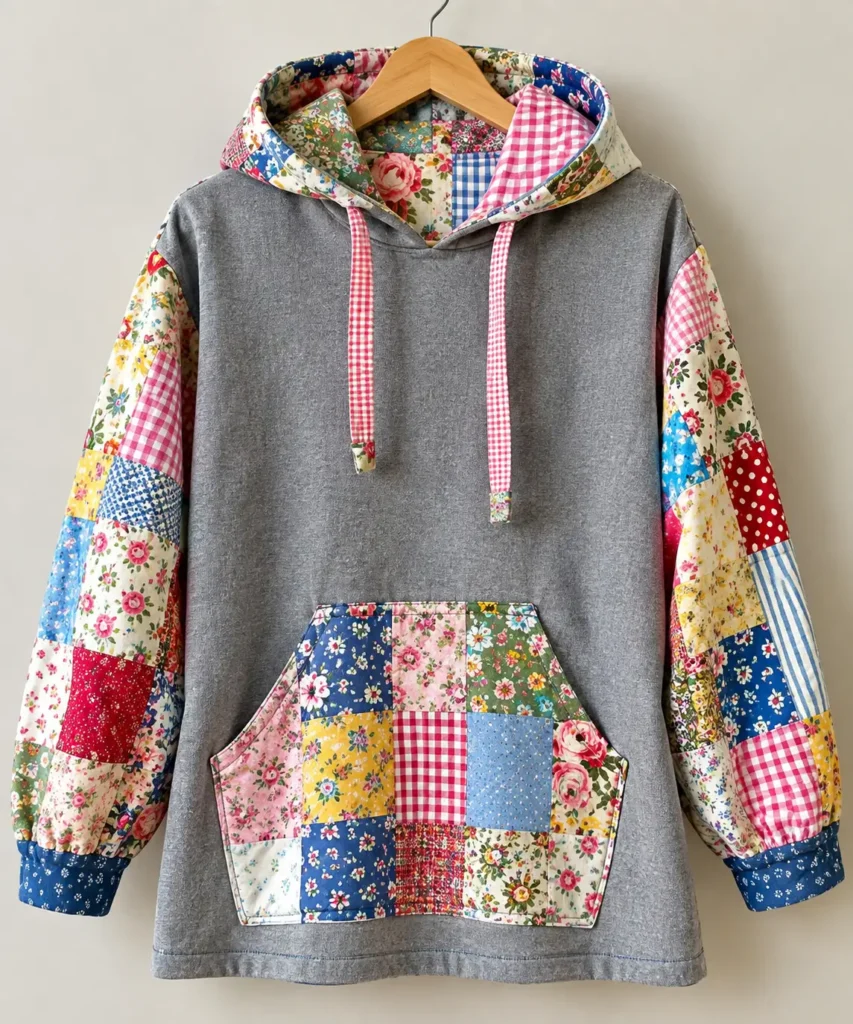
1. Choose the Top Style
First, decide what style of top you want to make. An easy option is to use a well-fitting top as a reference.
You can make the main body from a solid-colored fabric and use the scraps for the sleeves, pockets, hood, or waist details.
Another option is to make the entire garment from patchwork for a more colorful and playful look.
2. Prepare the Fabric Scraps
Choose fabrics with colors and prints that work well together. They do not need to match perfectly.
Cut the scraps into squares, rectangles, or strips of similar sizes. For a look similar to the second top in the image, you can combine small pieces in different shapes and sizes.
Before sewing, arrange the fabrics on a table so you can see how the colors and prints work together.
Tip: Repeating a few colors or prints throughout the garment can help create a more balanced and harmonious design.
3. Create the Patchwork Fabric
Start by placing two fabric pieces right sides together and sewing them with a seam allowance of approximately ¼ to ⅜ inch.
Open the seam and press it flat with an iron. Add another fabric piece and repeat the process.
Continue sewing pieces together until you have a patchwork panel large enough for the part of the top you want to cut.
Press the seams carefully as you work. This will make the finished garment look much neater.
4. Cut the Garment Pieces
Place your pattern pieces on the patchwork fabric and mark the pieces you need, such as:
- Sleeves;
- Front;
- Back;
- Pocket;
- Hood, if desired;
- Waist or hem details.
Cut each piece, remembering to leave the appropriate seam allowance.
If you are using a commercial sewing pattern, follow the measurements and instructions provided with the pattern.
5. Sew the Main Body
For an easier version, make the front and back of the top from solid-colored fabric.
Join the shoulder seams first and then sew the side seams, leaving the necessary openings for the arms.
Press the seams after each step to keep the garment neat and well structured.
6. Make the Patchwork Sleeves
The sleeves are one of the best places to showcase colorful patchwork.
Join your fabric scraps to create two patchwork panels. They do not have to be exactly identical, but try to keep the colors visually balanced.
Place the sleeve pattern over each panel and cut the pieces.
Sew the sleeves to the main body of the top, carefully matching the sleeve and armhole seams.
7. Add a Patchwork Pocket
To make the top even more charming, add a large patchwork pocket.
You can create the pocket from small squares and rectangles or use larger pieces of fabric for a simpler design.
Fold and press the upper edge, then sew it in place. Position the pocket on the front of the top and stitch around the edges.
8. Make the Hood or Neckline
For a design similar to the first top in the image, you can add a hood.
The hood can be made with solid fabric on the outside and patchwork fabric on the inside. This creates a colorful detail without making the entire garment look too busy.
For a simpler version, make a traditional neckline and use a printed fabric as a decorative accent.
9. Finish the Cuffs and Hem
For the cuffs, you can use patchwork fabric or a solid-colored fabric.
Fold the fabric, sew the short ends together, and attach the cuff to the sleeve.
Finish the bottom hem in the same way by folding the fabric inward, pressing it, and stitching it securely.
10. Add the Finishing Touches
Once the top is assembled, check all the seams and trim any loose threads.
Press the entire garment with an iron, paying special attention to the seams and hems.
For an extra decorative touch, you can add topstitching, embroidery, appliqué, or small fabric details.
Tips for a Beautiful Result
The secret to making this type of patchwork top is balance. Since the fabric scraps already attract attention, using a neutral color such as gray, white, beige, or navy blue for the main body can create a beautiful contrast.
This allows the colorful patchwork sleeves and pockets to stand out without making the garment look overly busy.
And the best part is that those little pieces of fabric that seem too small to use can become a beautiful, practical, and completely unique garment.