
French Braid Quilt Pattern
The French Braid Quilt, also known as a Modified French Braid Quilt, is a beautiful and versatile patchwork design. It is perfect for using fabric scraps and creating a colorful quilt full of movement and personality.
Although the finished quilt looks intricate, the construction is based on a simple repeated technique. By adding strips alternately to opposite sides of a center square, you gradually create the beautiful braided effect.
Materials
For a quilt approximately 60 × 80 inches, you will need:
- 12–20 different cotton fabrics
- Assorted 2.5-inch-wide fabric strips
- 2.5 × 2.5-inch fabric squares
- Rotary cutter
- Cutting mat
- Quilting ruler
- Sewing machine
- Cotton thread
- Iron and ironing board
- Batting
- Backing fabric
- Binding fabric
- Pins or quilting clips
You can adjust the number of strips and braid units depending on the size of the quilt you want to make.
Choosing Your Fabrics
This pattern looks especially beautiful when you combine different colors and prints.
Try mixing:
- Floral prints
- Polka dots
- Plaids
- Solids
- Small geometric prints
- Light and dark fabrics
For a colorful scrap quilt, don’t worry about making every fabric match perfectly. The variety is what gives the quilt its charm.
Before sewing, arrange your fabrics in the order you want them to appear. This makes it easier to create a balanced color distribution.
Step 1: Cut the Fabric
Cut several strips measuring:
2.5 × 8 inches
For a longer, more elongated braid, you can use:
2.5 × 10 inches
Also cut several:
2.5 × 2.5-inch squares
Try to cut all your pieces as accurately as possible. Consistent measurements will make the finished braid much easier to assemble.
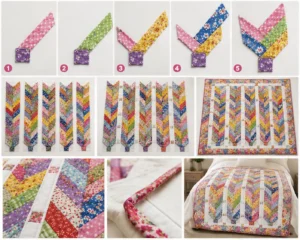
Step 2: Start the First Braid
Place one 2.5-inch square on your work surface. This will be the starting point of your braid.
Take your first fabric strip and place it along one side of the center square, right sides together.
Sew using a ¼-inch seam allowance.
Open the strip and press it flat with your iron.
Step 3: Add the Second Strip
Take a second fabric strip and place it on the opposite side of the first strip.
Sew it in place using the same ¼-inch seam allowance.
Open and press.
You will begin to see the characteristic diagonal shape of the French Braid.
Step 4: Continue Alternating Sides
This is the key to creating the braid effect.
Continue adding strips alternately:
Right → Left → Right → Left
After sewing each strip:
- Open the strip.
- Press the seam.
- Check that the edges are aligned.
- Add the next strip.
Keep repeating this process until your braid reaches the desired length.
Step 5: Create Your Color Sequence
One fun way to make the quilt more interesting is to create a planned color sequence.
For example:
Blue → Pink → Yellow → Green → Purple → Floral → Blue
You can repeat the same color sequence with different fabrics or create a completely scrappy arrangement.
Don’t be afraid to experiment. This pattern works beautifully with both coordinated fabrics and leftover scraps.
Step 6: Make Multiple Braid Units
Repeat the same process to create several braid sections.
For a quilt approximately 60 inches wide, start with five or six braid units and arrange them next to each other. Measure the overall width before deciding whether you need additional units.
One of the advantages of this pattern is that you can easily customize the quilt size by adding or removing braid sections.
Step 7: Trim the Braid Units
Once each braid is complete, place it on your cutting mat.
Using a quilting ruler and rotary cutter, carefully trim the sides so that each braid has straight edges.
Try to make all the braid units the same width.
Be careful not to trim away more fabric than necessary.
Step 8: Arrange the Braid Sections
Lay all your completed braid units on the floor or on a large table.
Experiment with different arrangements before sewing them together.
You can place all the braids in the same direction, or alternate their orientation to create additional movement in the quilt.
This is a great time to step back and look at the overall color balance.
Step 9: Join the Braid Units
Once you are happy with the arrangement, sew the braid sections together.
For a more defined design, you can add a narrow strip of fabric between each braid.
For example:
Braid | Sashing | Braid | Sashing | Braid
A sashing between approximately 1.5 and 2.5 inches wide can create a beautiful framed effect.
If you prefer a continuous patchwork appearance, simply sew the braid sections directly together.
Step 10: Add a Border
After assembling the main part of the quilt, add one or two borders.
You can use a neutral fabric or choose one of the colors already present in your braid.
A narrow inner border combined with a wider outer border can create a beautiful finished look.
Step 11: Make the Quilt Sandwich
Place the three layers together:
Backing → Batting → Quilt Top
Smooth each layer carefully to remove wrinkles.
Secure the layers with pins, quilting clips, or basting stitches.
Step 12: Quilt
There are many ways to quilt a French Braid quilt.
You can:
- Machine quilt with straight lines
- Hand quilt
- Follow the diagonal lines of the braid
- Add simple decorative quilting
- Use free-motion quilting
Following the diagonal lines of the braid is particularly beautiful because it emphasizes the movement of the design.
Step 13: Add the Binding
After quilting is complete:
- Trim the edges of the quilt.
- Make sure the corners are square.
- Prepare your binding strips.
- Sew the binding around the entire quilt.
- Finish the binding by hand or by machine.
Your French Braid quilt is now complete!
Tips for a Beautiful French Braid Quilt
- Always use an accurate ¼-inch seam allowance.
- Press after adding each strip.
- Keep your strips organized by color.
- Measure the braid units before joining them.
- Don’t worry if your fabrics aren’t perfectly coordinated—scrappy combinations can be beautiful.
- Make a small test block before cutting all your fabric.
A Beautiful Way to Use Fabric Scraps
The French Braid Quilt is a wonderful project for anyone who loves working with fabric scraps. Every strip can be different, allowing you to combine colors, patterns, and fabrics that might otherwise be left unused.
The result is a quilt that feels handmade, colorful, and full of personality.
Whether you choose soft florals, bold colors, vintage fabrics, or denim scraps, this pattern offers endless possibilities for creativity.