
Patchwork Girls’ Dress: A Detailed Step-by-Step Tutorial
How about turning fabric scraps into a charming little girl’s dress? This project is a wonderful way to use leftover fabrics and create a unique, beautiful garment made with love.
The dress can be made with floral prints, solid fabrics, and small fabric strips in coordinating colors. The result becomes even more beautiful when different prints are used throughout the skirt while keeping the bodice slightly more uniform.
Below is a detailed tutorial for making a dress similar to the one shown in the image.
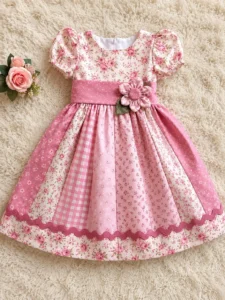
Materials You Will Need
- Cotton fabric scraps in different prints
- Cotton fabric for the lining
- Sewing thread
- Sewing machine
- Fabric scissors
- Measuring tape
- Sewing pins or clips
- Fabric chalk or washable fabric marker
- Iron
- Fusible interfacing, if needed
- Buttons or a zipper for the closure
- Fabric or ribbon for the waist sash
- Decorative trim, lace, or ric-rac for the skirt hem
- Paper for making the pattern
Tip: Try to use cotton fabrics with similar weights. Before cutting, wash and iron the fabrics to prevent shrinkage after the dress is finished.
1. Choose and Coordinate Your Fabrics
Start by selecting the fabric scraps you want to use.
To create a look similar to the dress in the photo, choose one main print for the bodice and combine it with several smaller prints for the skirt.
A beautiful color combination could include:
- Floral fabric as the main print
- Green for some skirt panels
- Beige or cream for balance
- Yellow to add brightness
- Brown or rust for contrast
- A small-scale print to complement the other fabrics
Place the fabrics next to one another before cutting. This makes it easier to see whether the colors and prints work well together.
2. Take the Child’s Measurements
Before making the pattern, take the child’s measurements.
The main measurements you will need are:
- Chest circumference
- Shoulder-to-waist length
- Desired skirt length
- Waist circumference
- Shoulder-to-hem length
- Arm circumference, if necessary
Add a seam allowance to the measurements. It is also important to leave enough ease so that the child can move comfortably.
Important: The measurements in this tutorial are only a general guide. Always adjust the pattern according to the child’s actual measurements.
3. Make the Pattern Pieces
The dress is basically made up of four main parts:
- Front bodice
- Back bodice
- Sleeves
- Skirt
You can use a well-fitting children’s dress as a reference. Place it over pattern paper, trace the main sections, and adjust the length as needed.
Make separate front and back bodice patterns.
For the skirt, you can use a slightly flared design or make a gathered skirt, which is one of the easiest options for beginners.
4. Cut the Bodice
Fold the fabric in half, place the pattern on top, and cut the front bodice.
Repeat the process for the back bodice.
If you want the dress to have more structure, cut the same pieces from the lining fabric.
Remember to leave a seam allowance around the pattern pieces.
After cutting, mark the important points with fabric chalk, such as:
- Center front
- Shoulder points
- Side seams
- Armholes
- Waistline
These markings will make assembly much easier.
5. Prepare the Patchwork Skirt Panels
Now comes the most creative part of the project: making the patchwork skirt.
Cut several fabric rectangles, keeping approximately the same height.
You can use six, eight, or more panels depending on the desired size and fullness of the skirt.
A beautiful arrangement could alternate the fabrics like this:
Floral → Green → Beige → Yellow → Floral → Brown
For a fuller skirt, make the panels wider or use more panels.
6. Sew the Skirt Panels Together
Place two fabric panels with their right sides facing each other.
Pin them together and sew along the side.
Open the seam and press it with an iron.
Continue adding the remaining panels, joining one fabric to the next.
When finished, you will have one large patchwork piece that forms the skirt.
Tip: Press each seam as you sew. This small step makes the finished patchwork much neater and more professional-looking.
7. Gather the Skirt
Sew a gathering stitch along the top edge of the skirt using a longer stitch length.
Gently pull the bobbin threads until the width of the skirt is approximately the same as the width of the bodice waist.
Distribute the gathers evenly.
Avoid placing all the fullness in just one section of the skirt.
8. Prepare the Sleeves
To create puff sleeves similar to those in the photo, cut two sleeves using your sleeve pattern.
Sew a gathering stitch along the top of each sleeve. You can also add a small amount of gathering at the bottom if desired.
Attach each sleeve to the corresponding armhole, carefully distributing the gathers.
Sew in place and finish the seam allowance.
9. Assemble the Bodice
Join the front and back bodice pieces at the shoulders.
Sew the seams and press them open.
Then sew the side seams of the bodice.
If you are using a lining, assemble the lining in the same way.
At this stage, carefully try the bodice on the child or compare it with the child’s measurements to check the fit.
10. Add the Closure
There are several ways to close the dress.
You can use:
- A zipper at the back
- Buttons
- Fabric ties
- Snap fasteners
For beginners, a simple back closure is often the easiest option.
If using a zipper, mark the center back and install the zipper before completely closing the back seam.
11. Attach the Bodice to the Skirt
With the skirt already gathered, place it against the bodice with the right sides facing each other.
Carefully align the side seams and center front.
Pin the pieces together and sew around the entire waistline.
After sewing, press the waist seam carefully with an iron, making sure there are no unwanted folds.
12. Make the Waist Sash
To give the dress an extra charming detail, make a sash using a contrasting fabric.
Cut a long strip approximately 4–5 inches wide, depending on the child’s size.
Fold the strip in half, sew along the edges, turn it right side out, and press it neatly.
The sash can be tied into a bow at the back or at the side of the dress.
13. Make a Decorative Fabric Flower
The flower at the waist is optional, but it adds a lovely handmade touch.
You can make a fabric flower using small pieces of the same fabrics used throughout the dress.
Cut several petals, sew or gather them together to form a flower, and add a button or small fabric circle to the center.
Attach the flower to the waist sash.
Another option is to make the flower removable by attaching it with a suitable safety pin or brooch mechanism.
14. Finish the Hem
To finish the bottom of the skirt, fold the raw edge inward and press it with an iron.
Sew carefully around the entire hem.
If desired, add lace, ribbon, ric-rac, or another decorative trim.
A contrasting fabric strip can also be added to create a colorful patchwork-style hem.
15. Complete the Finishing Details
Take a moment to inspect the entire dress.
Trim loose threads and finish the inside seams to prevent the fabric from fraying.
Pay special attention to:
- Armholes
- Neckline
- Sleeves
- Side seams
- Waistline
- Closure
- Hem
Give the finished dress a careful final pressing to set the seams and give the garment a polished appearance.
Tips for Making the Dress Even More Beautiful
The charm of a patchwork dress comes from the combination of fabrics. Don’t be afraid to mix different prints.
To create a harmonious result, choose one or two colors that appear in several of the fabrics. This helps different prints look as though they belong to the same collection.
Another great tip is to choose one main print and use the other fabrics as accents.
You can also use small scraps to create:
- Bows
- Fabric flowers
- Pockets
- Waist sashes
- Appliqués
- Sleeve details
- Decorative hems
A Dress Made With Love
The most beautiful thing about this project is that every dress can tell a story. Fabric scraps that have been sitting in a sewing box can be given a new life and transformed into something special for a child.
Besides being a wonderful way to use leftover fabric, patchwork allows you to create combinations that would be difficult to find in a ready-made garment.
With creativity, a handful of fabric scraps, and a little patience, you can turn simple pieces of fabric into a unique, colorful, and lovingly handmade little girl’s dress.